Configuring Microsoft SQL Server in Data Services Manager version 9.1
 Now that Data Services Manager version 9.1 is officially announced, I thought this would be a good time to step through the configuration of our new data service, Microsoft SQL Server. This is possibly the most requested data service I have heard from our customers since I started discussing Data Services Manager (DSM). Therefore I am personally very happy that SQL Server is now available in the 9.1 version of the product. There are a number of steps that need to followed to get this data service up and running, and note that I am only doing this in the context of DSM Manager on vSphere. In a future post, I will discuss the steps to integrate SQL Server into VCF 9.1 and VCF Automation (VCFA), which is also a pretty interesting topic. For now, we can summarise the steps to create a SQL Server DBaaS (database as a service) as follows. We will assume that the VI Admin has already created an infrastructure policy with resources that can be used for the provisioning of SQL Server, as well as granting some users permission to access Data Services Manager:
As a DSM Admin, deploy the SQL Server instance (part 1):
- In the DSM UI, link an image registry for the SQL Server images
- Enable the SQL Server version
- Setup Active Directory and a special DSM Privileged Account (optional)
- Create a SQL Server Instance/Engine
- Enable SQL Server Agent (optional)
- Configure SQL Server (optional)
- Test connectivity to SQL Server Instance/Engine
As a DSM Admin, setup access controls (part 2):
- In the Data Services Manager UI, create a namespace and add users to the namespace
- Setup a Data Service Policy to determine which users have access to SQL Server by selecting namespaces for inclusion in the policy
- Fine tune Data Service Policy to define Infra Policies and optional Backup controls available to DSM Users when provisioning SQL databases
- Continue tuning Data Service Policy to determine which user types can connect to the database as (AD user or SQL user)
As a DSM User, deploy a SQL Server database (part 3):
- In the Data Services Manager UI, create SQL Server Database
- Chose the SQL Server Instance (as per the Data Service Policy)
- Select user who will be granted db_owner role (AD user or SQL user)
- Configure backup settings
- Test connectivity to SQL Server Database
This is a lot to get through, and there are a number of different personas to discuss as well, especially if you want a full automated Active Directory integration experience. So let’s begin:
Personas
Here is a screenshot taken from a deck that I use when speaking to customers about SQL Server / Active Directory personas and Data Services Manager. The one that most of you may be unfamiliar with is the Privileged User. In a nutshell, if this user is configured, it has the ability to generate the Kerberos keytab file required for SQL Server AD authentication, i.e., it has the privileges to write Service Principal Names. This means that integrated authentication using AD username can be used to access SQL Server. Without this privileged user, enabling AD integration on every SQL Server Instance is a very manual process. The manual approach is still available however, which is why the privileged user is marked as optional. The other personas are explained in the accompanying text.

As we go through the deployment, I will highlight the role that each of these personas play in the setup. In my example, I already have a number of running databases, including a SQL Server Instance and Database. However, we will go through the process of creating a new SQL Server Instance and Database in this post.

Create the SQL Server Instance/Engine
Step 1: Setup image registry
As highlighted in the introduction, there are a number of steps involved in deploying the SQL Service Engine. Since these are container images provided by Microsoft, and are not open source, we cannot embed these images in Data Services Manager. Instead, the images must be retrieved from the Microsoft Container Registry (mcr). Fortunately, Data Services Manager makes this very easy. Under Version & Upgrade, select Image Registries and Add one for the SQL Server data services that points to the “mcr.microsoft.com” endpoint and the “mssql” repository, as shown below.

Step 2: Enable SQL Server version
Once the image registry is configured, the image(s) will begin to sync to Data Services Manager. Once synchronised, the image(s) need to be enabled for use. To do this , remain in the Version & Upgrade section, and select SQL Server. Choose the version, which for this initial 9.1 release is 2022 CU22 (CU: Cumulative Update). Click Enable and the status should change to Enabled, as shown below. We can now provision SQL Server instances using this image.

Step 3: Configure Active Directory Domain
Let’s integrate SQL Server with Active Directory. This allows us to use integrated authentication with Active Directory, allowing AD users to access the databases. Select the options to automatically write the Service Principal Names, and automatically update DNS. Setup an Active Directory account with the necessary permissions to do these tasks (write DNS, write SPN) – in this example, the AD user is called sqlprivadmin. When configuring Active Directory Domain, provide the Domain, the DNS server to write the FQDN of the SQL Servers, enable DSM Privileged Account, and set the privileged account username and password. You will find the option to setup an Active Directory Domain location under Databases > SQL Server, and under the Active Directory Domains tab. Then select the Create Active Directory Domain tab. Here is an example of my configuration for reference. The DNS Servers are taken from Data Services Manager, but as you can see, an alternative DNS server can be chosen if it is different to the ones configured on the DSM appliance.

With Active Directory Domain configured, proceed to the creating of the SQL Server instances.
Step 4: Create SQL Server Instance
In the initial ‘Basic Information’ screen during the creation of a SQL Service Instance, information such as version, instance name, edition as well as administrator username and password are requested. As there is only a single 2022 CU22 version in this initial 9.1 release, that is the only version that can be selected. Proceed to provide a name for the instance along with the edition of SQL Server. Note that some of the editions do not require a license, but are limited in the functionality that they provide, e.g. Developer edition, Express edition. However other editions do require a license from Microsoft. There is also an option in the editions field to provide a license key, and I am reliably informed that this will result in the associated SQL Server edition getting selected. The other section in the basic section is integration with Active Directory, where you select the Domain created in the previous step. If AD integration is selected, you are then prompted to optionally select the privileged user for writing SPNs and writing DNS. You will also need to provide the Group Membership AD user which we mentioned in the personas section above. Note that the Group membership AD user does not have the domain qualification added – simply add the username and password.

Finally, add the FQDN of the instance and whether you wish to use your own custom certificates for communication with the database or if you wish to use DSM-Managed certificates (the default). This then completes the basic information section.
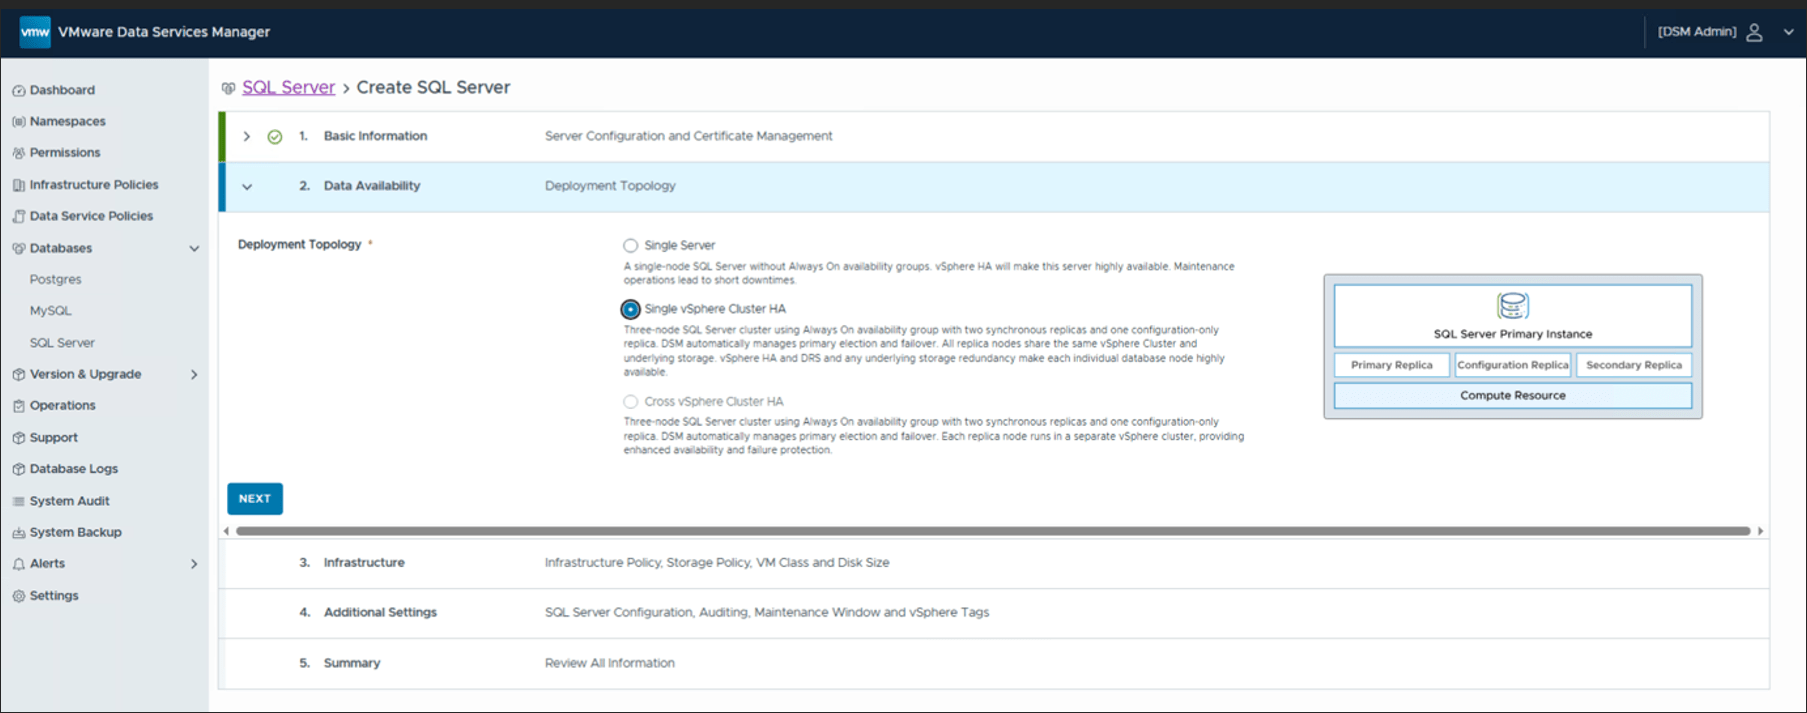
The next section covers the deployment topology. For SQL Server instances, Data Services Manager can provision single node or clustered deployments. The three node SQL Server cluster uses an Always On availability group with two synchronous replicas and one configuration-only replica. In this example, a highly available instance is selected. Setting up SQL Server clustering is just a single click.
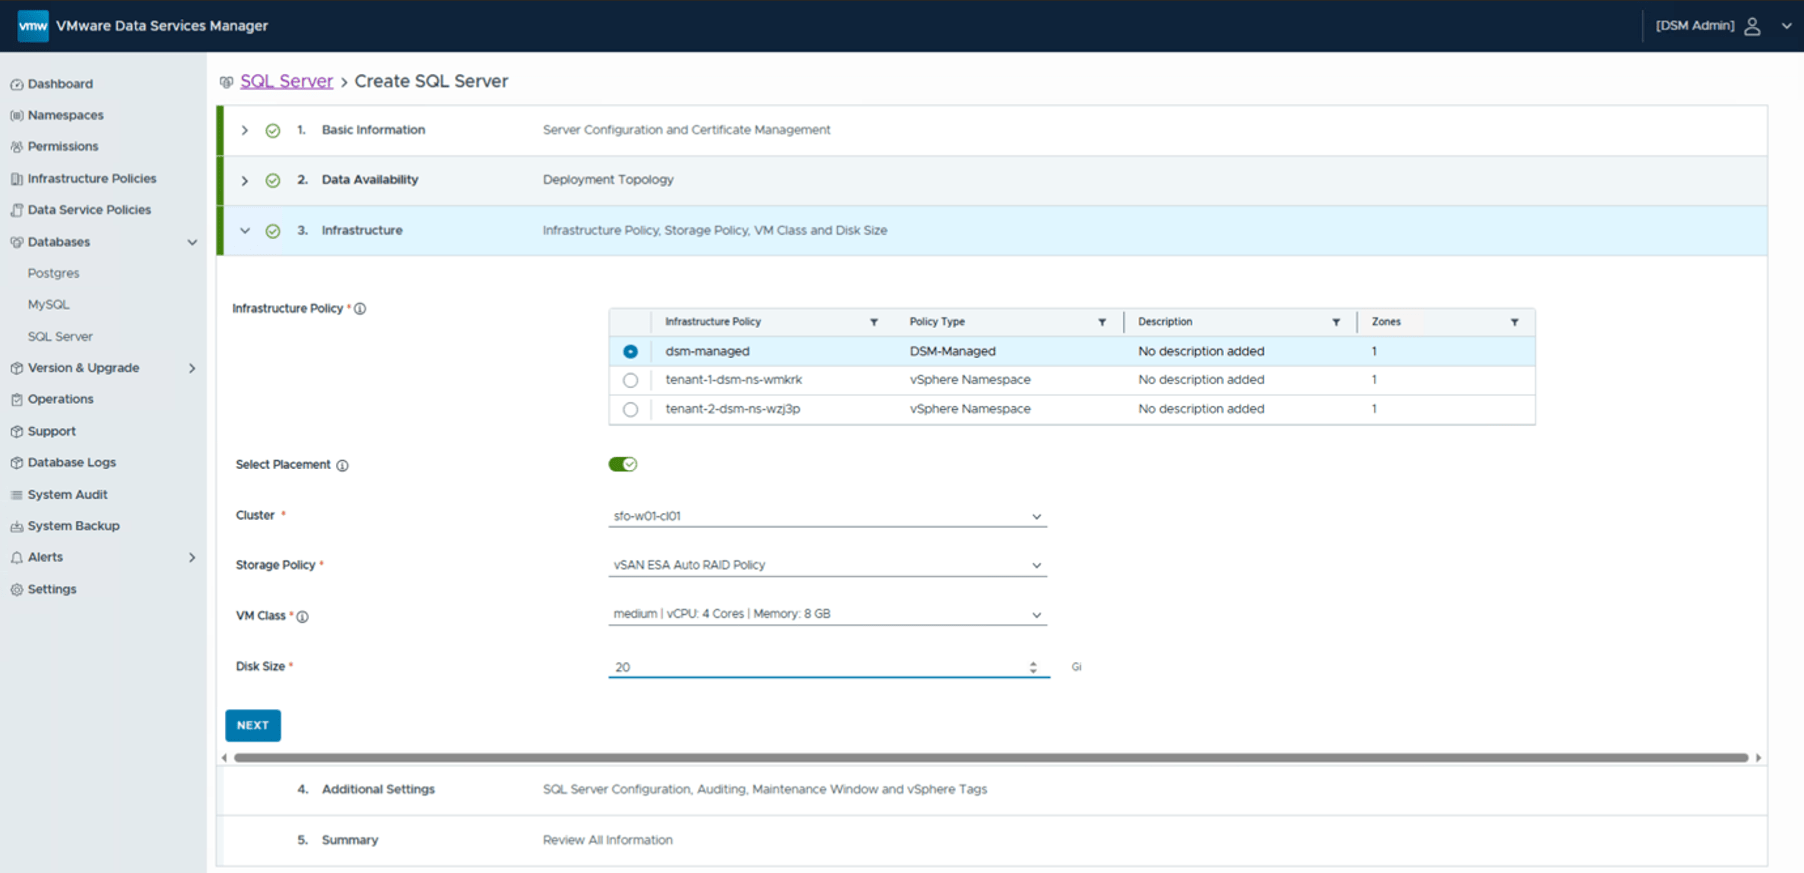
This now brings us to the Infrastructure section. This is where the Infrastructure Policy and its associated resources are selected. We have chosen a DSM-Managed infrastructure policy which references vSphere resources directly. The other option is to use an infrastructure policy which uses resources defined in a vSphere (Supervisor) Namespace. The vSphere Namespace option will be examined in more detail when VCF Automation integration is discussed in a future post. Note that for SQL Server, the pre-defined VM Class size of small is unsupported and is not available for selection.
Step 5: Additional SQL Server Settings
We now get to the point where you can configure the SQL Server to meet many different requirements. For example, you can enable SQL Server Agent for running TSQL-based jobs on the database. These jobs can range from index optimisations to the running of database integrity checks. The SQL Server Agent and associated jobs are a feature commonly used by SQL Server DBAs. There are also a host of configuration options that can be set on the database. In the example below, I have a single configuration setting called errorLog.numErrorLogs set to a value of 25. Many other configuration options are available. Another option that can be enabled in Auditing. I have set the audit feature to log failed logins only, and to keep this information available for 30 days.

Review the Summary and then click the create button to commence the creation of the SQL Server instance. After a few minutes, the SQL Server Instance should now appear Online. Click into the instance to examine the settings. This will allow the DSM Admin to retrieve the connection string for the SQL Server instance. The instance can also be modified from here if necessary.

Connect to the SQL Server Instance/Engine
With the connection string retrieved, standard Microsoft tools such as SQL Server Management Studio can now be used to connect to the instance. The connection string includes the admin credentials, server FQDN and the database to connect to (master). The connection string can be passed directly into the connection parameters section as shown below:

All going well, this will open a connection to the instance, and all of the system databases should now be visible:

Success! The SQL Server engine has been deployed and we can connect to it using the mssql_admin credentials put in place by DSM. We can also se that the SQL Server Agent is present, and if we examined the database in more detail, we would find our configuration options and auditing settings also in place. Now we need to verify that we can use this instance to offer a true DBaaS (Database as a Service) to our end users. By that I mean, can our DSM Users now provision databases on this instance for their own purposes? Let’s find out.
Use Permissions and Namespaces to give users access
We are now in the DSM Admin (part 2) section highlighted in the introduction. The DSM Admin must give DSM Users access to the SQL Server instance so that they can provision their SQL Server databases on the instance. I will skip the step of creating namespaces and permissions, but will make the assumption that some users have already been added to my new “internal-ns” namespace. With that in mind, I can proceed to the creation of the Data Service Policy which forms the relationship between the namespace and the data service and thus, by extension, the relationship between the users in the namespace and the data service.

With the namespace chosen, you can now proceed to select the SQL Servers that these users are allows to provision databases onto. You can also select which backup locations they are allowed to use. A note here about backup locations – the Object Store hosting the S3 bucket for SQL Server backups must be provisioned with a valid certificate. A self-signed certificate won’t work here. There is also a requirement to have backups configured for databases deployed on clustered SQL Server (AlwaysOn) instances, FYI. Here is an example from my setup:

Complete the configuration by selecting the “Allowed User Types” for the databases that these users are allowed to provision on the instance. You can choose between Windows Principal and/or SQL User. In this example, because I have AD integration, I am allowing both.

Complete the setup of the Data Service Policy. We are now ready to check if our DSM User can successfully provision a SQL Server Database on this SQL Server Instance.
Provision a SQL Server Database
Log out of the Data Services Manager portal as the DSM Admin and log back in as a DSM User. Navigate to Databases > SQL Server. From the available tabs, select Databases, then click on Create Database. From here, the selectable options are completely controlled by the Data Service Policies. The user can select the namespace from the drop-down list if they are a member of multiple namespaces. Next, they select which SQL Server instance they wish to provision the database on. Again, they may have been granted access to multiple instances by the Data Service Policy. Finally, they give the database a name:

The next step is to define the db_owner. Again, since we granted the user to have either an AD User (Windows Principal) or a SQL User, both are offered as options. If the Data Service Policy stated that it was one user type or the other, then that is what would appear here. Since we have fully integrated with Active Directory and have a privileged user for Write SPNs, we can set an AD user as the db_owner. Note that this user requires the domain name to be included. One other important point – this user must also support Kerberos AES 128 bit encryption and Kerberos AES 256 bit encryption. This is a property of the User account configured in Active Directory.

To complete the database deployment, you can fine-tune the backup requirements, assuming you have control to do so from the Data Service Policy. Review the summary and create the database. Soon the database should become ready and accessible.
Connect to the SQL Server Database
When the database is Ready, the status should be reflected in the SQL Server Database view.

Click on the Database to get more details, including the Connection String.

Now, logon to the desktop of the user who wishes to use their AD account to access the SQL Server database, in this case “arkham\george”. Launch the SQL Server Management Studio once more (in this case it is version 2022). Paste the connection string into the appropriate field and connect:

Note that you may need to add “TrustServerCertificate=True;” if you get a certificate error when trying to connect. However, assuming everything is working, the user “arkham\george” should be able to connect to the database that he just provisioned via Data Services Manager:

Success! The AD user “arkham\george” has been able to successfully access their database, and note that they can only see their own database. They do not have access to any of the system databases. This implies that all of our configuration, from the privileged user to Write SPN and Write DNS, to the Group Membership AD user and eventually our db_owner AD user is working as expected. Data Services Manager can now offer a true DBaaS to our SQL Server customers.
Summary
Data Services Manager now offers a new data service, Microsoft SQL Server. In the above how-to, we saw how to provision SQL Server Instances and automatically integrate with Active Directory and DNS for a seamless deployment experience. This data service also offers a true Database as a Service (DBaaS) to customers, allowing DSM Admins controls over resources and engines, while still allowing consumers to provision their own SQL Server databases onto existing Instances. Of course, you could also give the full SQL Server Instance to an end-user if you wish – there is nothing to stop you from taking that approach if that is what you wish to offer your users. Or perhaps it is a combination of both – some users get the full instance, and other users get one or more databases. Data Services Manager can offer both. This guide has focused on how to achieve this with standalone Data Services Manager consuming vSphere resources. In a future post, we will look at how this data services in integrated into VCF Automation version 9.1 for a true multi-tenanted experience. Stay tuned for that, and thank you for reading to this point.
One Reply to “Configuring Microsoft SQL Server in Data Services Manager version 9.1”