Provisioning databases with Aria Automation, Cloud Consumption Interface and Data Services Manager – Part 2: CCI
 In the part 1 blog post, we discussed how to setup Aria Automation version 8.17 so that it could be used with Cloud Consumption Interface (CCI) to provision databases using Data Services Manager. In this post, we will look at the steps to integrate Aria Automation with CCI. There is a dependency here on vSphere 8.0U2 and vSphere with Tanzu, which we will assume has already been deployed. Thus, the main task at this point is to setup and enable the CCI Service on the Supervisor Cluster of vSphere with Tanzu. (Although I haven’t done a blog post of vSphere with Tanzu for some time, some of my earlier blog posts on the topic may prove useful). Warning: The CCI Service uses the concept of a PodVM aka vSphere Pod. At present, vSphere Pods do not support DHCP. Thus, it is important that the vSphere with Tanzu workload network, which is the network that the PodVMs connect to, is using a static range of IP addresses to support CCI. If you try to use DHCP with PodVMs, you will encounter X509 certificate issues as the container in the CCI Service PodVM tries to start.
To setup the CCI Service, following the instructions outlined in the official documentation. I will show these instructions step-by-step in this post.
Pre-requisites
- Ensure that Workspace ONE/Identity Manager Access uses userPrincipalName as the directory search attribute. This was done during part 1 of the setup.
- Ensure that the Python Programming Language is available in your environment. It needs to also have the ‘requests’ module installed.
- Ensure that the vCenter(s) running your environment are also federated to the same Active Directory as your Aria Automation.
To connect your vCenter to Active Directory, go to the Administration section of your vSphere client. Under Single Sign On , select Configuration. Under Identity Sources, click ADD, and add the details of your Active Directory configuration. Here is an example of the configuration I used for my Active Directory over LDAP. Note for LDAPS, you will need to provide a CA (certificate of authority).

That completes the pre-requisites. We can now get on with the installation of the CCI Service.
CCI Service Setup
There are two files which need to be downloaded in order to setup the CCI Service. These are outlined in the official documentation for Aria Automation 8.17 linked previously. They are:
- Service definition YAML file: cci-supervisor-service.yml from https://via.vmw.com/OPFXlS
- Python script: service_config_from_automation.py from https://via.vmw.com/DZTBLu
In the vSphere Client, navigate to Workload Management from the left-hand menu bar. Next, select Services and then click on ADD to add a new service.

This opens the ‘Register Service’ dialog. Here you will be prompted to provide a YAML manifest to create a new service. This will be the Service Definition manifest file downloaded previously.

Click on the UPLOAD button and select the cci-supervisor-service.yml. After uploading the manifest, the register service window should display something similar to the following.

Click FINISH. The new CCI Service should now be available is the list of Workload Management Services.
 The Service is now available, but it has not yet been installed on any vSphere with Tanzu Supervisor Clusters (as per the zero value against the Supervisors in the CCI Service Window). The next step is to install it on my Supervisor. In the CCI Service, click on Actions. In the drop-down, select the option Install on Supervisors.

This is where the python script that we downloaded earlier is necessary. The script is used to retrieve what is called an idpConfig YAML payload from the VMware Aria Automation. Since it is written in Python, you will need programming language installed on your laptop or desktop. It also needs to have the ‘requests’ module installed. Without this module, the script may fail with “ModuleNotFoundError: No module named ‘requests'”. Use the command “pip3 install requests” to install the requests module. Now you can run the service_config_from_automation.py script to retrieve the idpConfig YAML from your Aria Automation appliance.
% ./service_config_from_automation.py vra.rainpole.com

idpConfig: |
  {"issuer_url": "http://identity-service.prelude.svc.cluster.local:8000", "keyset": {"keys": [{"kty": "RSA", "kid": "6140600582782055133", "use": "sig", "n": "a very long string here", "e": "AQAB"}]}}
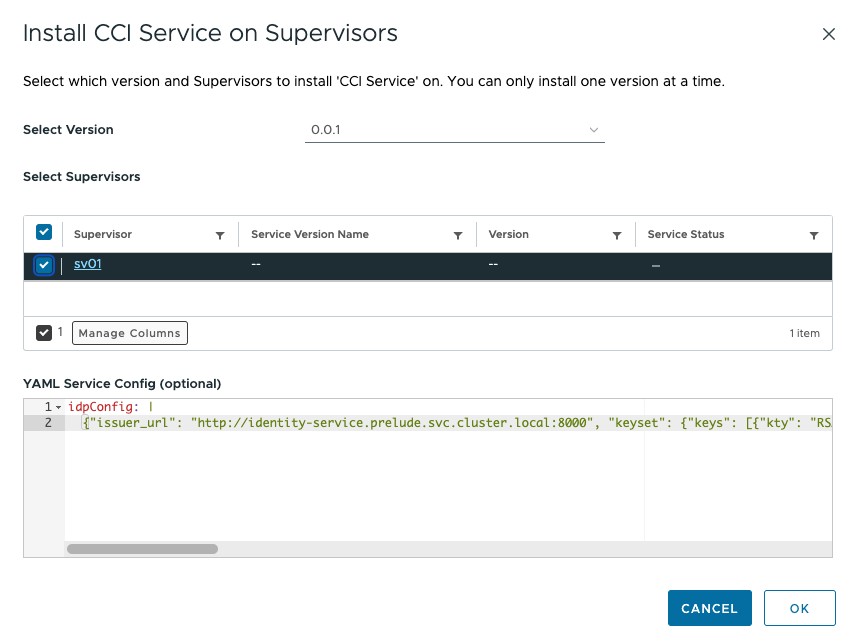
Select the Supervisor Cluster that you wish to have configured with Aria Automation and paste in the idpConfig information as shown below:
The CCI Service should now enter a Running state. However it is also important to note the Container setting. This should show 1/1 containers. Select the CCI Namespace, and then the Compute tab. Under vSphere Pods, you should be able to see the Phase as Running and Containers of 1/1. If the container doesn’t start and remains at 0/1, then further investigation is needed. Remember the warning pointed out earlier that you cannot have a workload network with DHCP if you wish to use CCI. It must be a workload network with a static range of IP addresses.

Another way to verify the state of the vSphere Pod is via the kubectl command line tool. This step is also useful for troubleshooting as it allows you to look at the logs of the vSphere Pod, as shown below.
% kubectl vsphere login --server=supervisor --insecure-skip-tls-verify  --vsphere-username administrator@vsphere.local
Password: ********

Logged in successfully.

You have access to the following contexts:
   supervisor
   cormac-ns
   svc-cci-service-domain-c144

If the context you wish to use is not in this list, you may need to try
logging in again later, or contact your cluster administrator.

To change context, use `kubectl config use-context <workload name>`


% kubectl config use-context svc-cci-service-domain-c144
Switched to context "svc-cci-service-domain-c144".


% kubectl get all
NAME                               READY   STATUS    RESTARTS   AGE
pod/cci-service-78bd484df6-g2bnf   1/1     Running   0          2m

NAME                  TYPE        CLUSTER-IP    EXTERNAL-IP   PORT(S)   AGE
service/cci-service   ClusterIP   10.96.1.118   <none>        443/TCP   2m

NAME                          READY   UP-TO-DATE   AVAILABLE   AGE
deployment.apps/cci-service   1/1     1            1           2m

NAME                                     DESIRED   CURRENT   READY   AGE
replicaset.apps/cci-service-78bd484df6   1         1         1       2m


% kubectl logs cci-service-78bd484df6-g2bnf
I0622 12:04:05.465545       1 main.go:28] Starting CCI supervisor service version: buildnumber: buildtype:
I0622 12:04:05.466881       1 config.go:59] Config loaded for issuer='http://identity-service.prelude.svc.cluster.local:8000', clientID=''
I0622 12:04:05.485544       1 pinniped_config.go:43] Creating Pinniped WebhookAuthenticator: name=vmware-cci-service-webhook, URL=https://cci-service.svc-cci-service-domain-c144.svc.cluster.local/tokenreview
I0622 12:04:05.493023       1 pinniped_config.go:67] Successfully created WebhookAuthenticator vmware-cci-service-webhook
I0622 12:04:05.493755       1 main.go:123] Preparing to serve token review requests on https://localhost:5443/tokenreview
I0622 12:04:05.493800       1 main.go:128] Preparing to serve health checks on https://localhost:5443/healthz
Everything looks like it is up and running. The CCI Service is running and connectivity is now established between the vSphere with Tanzu Supervisor and Aria Automation. In the next part, we will complete the CCI integration (projects, regions, supervisor namespaces) before finally taking a look at how to install the DSM CCI components. This will allow the provisioning of databases via a Supervisor service using Aria Automation with Data Service Manager.
One Reply to “Provisioning databases with Aria Automation, Cloud Consumption Interface and Data Services Manager – Part 2: CCI”