DSM 9.0.1 – Using VCFA Blueprints to provision databases
![]() In my previous post, I showed how the VCF Consumption CLI could be used to provision a MySQL database when Data Services Manager is integrated with VCF Automation. We could use the same VCF Consumption CLI to provision Postgres databases also. However, I wanted to show you another way that databases could be provisioned using blueprints in VCF Automation (VCFA). Readers may find this useful as it will allow you to track MySQL database instances provisioned via VCF Automation, even though the MySQL Data Service Policy and MySQL databases are not currently plumbed up into the VCFA UI (his will be added in a future release). The main feature of blueprints is that it allows for a more sophisticated definition of an application with multiple VMs, load balancers, etc and can be deployed with single click. The “application”, in this case it is just a database, and it will show up as a deployment in the tenant namespace. However, the database could just be one part of a blueprint, with many other components added to the blueprint for a complete “one-click” application deployment.
In my previous post, I showed how the VCF Consumption CLI could be used to provision a MySQL database when Data Services Manager is integrated with VCF Automation. We could use the same VCF Consumption CLI to provision Postgres databases also. However, I wanted to show you another way that databases could be provisioned using blueprints in VCF Automation (VCFA). Readers may find this useful as it will allow you to track MySQL database instances provisioned via VCF Automation, even though the MySQL Data Service Policy and MySQL databases are not currently plumbed up into the VCFA UI (his will be added in a future release). The main feature of blueprints is that it allows for a more sophisticated definition of an application with multiple VMs, load balancers, etc and can be deployed with single click. The “application”, in this case it is just a database, and it will show up as a deployment in the tenant namespace. However, the database could just be one part of a blueprint, with many other components added to the blueprint for a complete “one-click” application deployment.
Let’s start with the prerequisites. To begin with, a Data Service Policy will be required to allocate permissions and resources to tenants to create data services. If you wish to know more about Data Service Policies, there is a detailed description in this introductory blog post on DSM & VCFA integration. If you wish to provision a Postgres database, then the steps to create a Data Service Policy for Postgres are available in the VCFA UI. You can see how to do this, along with the other setup steps, in the blog I just referenced previously. However, if you wish to create a Data Service Policy for MySQL databases, then you will have to do this step via the API because, as mentioned, it is not yet plumbed up in the UI. The steps to do this are in my previous blog post, so you can follow the steps on how to create a MySQL DSP and database there.
We can now proceed with creating a database blueprint in VCFA. In the Tenant Organization, under Build and Deploy, select the Blueprint Design from the left-hand navigation menu. You can upload the blueprint code from a file, or create it directly. In the Organization select Blueprint Design > Blueprints > New From and then decide if you want to use a ‘Blank canvas’ to create the template or to ‘Upload’ it from a file.

Next, provide details about the blueprint template, such as a name, a description, and an optional custom icon. You can also select which Project within the Organization has access, and decide if, at some point, you want to grant other Projects in the same Organization access as well. That is what I have done here.

Let’s being with what a blueprint looks like from a blank canvas:
![]()
So we will populate both the inputs and the resources section. I will define my inputs which will be later used to form variables for my database, and also use a cciNamespace and dsmDb Supervisor resource. The latter is only achievable when the Consumption Operator is installed on the Supervisor, which provides the Supervisor with CRDs for DSM databases. Once those resource are in place, I can use a standard DSM YAML manifest for provisioning. Note that because I plan to use variables in my blueprint code, the formatVersion field will need to be bumped to 2.
I am making a few assumption about my VCFA and DSM environments. I am assuming that the namespaces in the code below have already been selected as valid DSM infrastructure policies. I am also assuming that there is a valid Data Service Policy created which grants access to the Postgres data service to the Organisation where my tenant namespace resides. With those assumption in mind, here is a blueprint for creating Postgres databases via VCFA using DSM. You can use this code sample to create your own blueprint. Lines which begin with a # are comments, and do not need to be included in the actual code.
# Blueprint to provision DSM Postgres Database
# Assumption is that Data Service Policy already exists and that the ORG where the tenant resides has been granted access to provision databases
# Another assumption is that the namespace where the database is provisioned to is part of an infrastructure policy
# Kudos to Eric Gray for initial template
#
formatVersion: 2
inputs:
  dbName:
    type: string
    title: Database Name
    description: Name of Postgres DB - leave blank to use deployment name; 4 character minimum
    #minLength: 4
    default: '' # indicates optional
  namespace:
    type: string
    title: Namespace
    description: Tenant namespace for this deployment
    default: same-ns-5hklb
  dbInfraPolicy:
    type: string
    title: Infrastructure Policy
    description: Target DSM infrastructure policy or namespace
    enum:
      - same-ns-5hklb
      - diff-ns-same-org-6mbgt
      - dsm-ns-01-5rvdd
    default: same-ns-5hklb
  storagePolicy:
    type: string
    title: Storage Policy
    description: vSphere Storage Policy
    default: vSAN Default Storage Policy
  diskSize:
    type: integer
    title: DB Disk Size
    maximum: 80
    minimum: 20
    default: 20
  backupLocation:
    type: string
    title: Backup Location
    description: S3 storage bucket configured for DSM backups
    enum:
      - none
      - dsm-backups
    default: dsm-backups
  dbAvailability:
    type: string
    title: Availability Model
    description: Single VM or Primary/Replica HA Cluster
    default: single
    oneOf:
      - title: Single VM
        const: single
      - title: HA Cluster
        const: cluster
  dbVersion:
    type: integer
    title: Postgres Major Version
    description: Major version of the database being provisioned
    maximum: 17
    minimum: 12
    default: 17
# Some of the inputs may need some pre-handling before getting back to the manifest below
variables:
  dbName: ${to_lower(input.dbName || env.deploymentName)}
  dbClass: ${input.dbAvailability == "single" ? "best-effort-large" :"best-effort-xlarge"}
  backup: ${input.backupLocation != "none" ? input.backupLocation :null}
  dbVersion: ${to_string(input.dbVersion)}
  backupConf:
    backupRetentionDays: 30
    schedules:
      - name: default-full-backup
        type: full
        schedule: 59 23 * * 6
      - name: default-incremental-backup
        type: incremental
        schedule: 59 23 1/1 * *
resources:
  cciNamespace:
    type: CCI.Supervisor.Namespace
    properties:
      name: ${input.namespace}
      existing: true
# Supervisor resource, in this case a DSM database, which is created in
# the Namespace context and will either succeed or fail
  dsmDb:
    type: CCI.Supervisor.Resource
    properties:
      context: ${resource.cciNamespace.id}
      wait:
        conditions:
          - status: 'True'
            type: Ready
          - status: 'True'
            type: TerminalFailure
            indicatesFailure: true
# This manifest is now identical to the YAML code used to create a database using the DSM API
# The only difference is that we are populating field based on the inputted variables above
# Essentially, the DSM APIs are made available to vSphere through the DSM Consumption Operator
# which is installed as a Supervisor Service, allowing VCF Automation to consume them
      manifest:
        apiVersion: databases.dataservices.vmware.com/v1alpha1
        kind: PostgresCluster
        spec:
          adminUsername: pgadmin
          databaseName: ${variable.dbName}
          version: ${variable.dbVersion}
          storageSpace: ${input.diskSize + 'Gi'}
          storagePolicyName: ${input.storagePolicy}
          infrastructurePolicy:
            name: ${input.dbInfraPolicy}
          replicas: ${input.dbAvailability == "single" ? 0 :1}
          vmClass:
            name: ${variable.dbClass}
          maintenanceWindow:
            duration: 6h
            startDay: SATURDAY
            startTime: '23:59'
          backupLocation: ${variable.backup != null ? {'name':input.backupLocation} :null}
          backupConfig: ${variable.backup != null ? variable.backupConf :null}
        metadata:
          name: ${variable.dbName}
          namespace: ${resource.cciNamespace.name}
The main sections of the code related to resources are input, variables and resources. My two resources are:
- Supervisor Namespace – CCI.Supervisor.Namespace – is used to create ( or select ) a Supervisor Namespace, which provides a Kubernetes-based workspace with resource limits, user access, and available Supervisor services so we can provision our VM and TKG resources based on our application needs.
- Supervisor Resource – CCI.Supervisor.Resource – is used to create any supported Supervisor K8s resource within a Supervisor Namespace, such as (using their K8s object kind), virtualmachines, virtualmachineservices, tanzukubernetesclusters, persistentvolumeclaims, secrets, and so on, depending on the K8s manifest we pass to the Supervisor resource we are configuring. Since we have extended the API with the Consumption Operator to add a DBaaS Supervisor Service, we can request a PostgresCluster as shown above. We would not be able to request this objectwithout the Consumption Operator in place.
Next, add the code to the blueprint. You can see here that the canvas has recognised the Supervisor Namespace element and the dsmDb element, and placed both of these on the canvas. These are CCI template elements included in the Cloud Consumption Interface. These can also be dragged, dropped and configured via the canvas, if you wish.

Once the code is added, we can do a check to verify that the syntax is correct. In the lower left hand side of the canvas there is a ‘TEST’ button. It will launch the inputs wizard for the database. Here you can test populating any necessary fields and check that any enum fields and any maximum/minimum fields are working correctly. If the syntax is working, the test result should show successful. Note that this does not validate the selections exist on the back-end. It is simply a syntax checker.

Next, click on the ‘VERSION’ button. This will allow us to push a version of the blueprint template to the catalog. You can add a description and a “Change log” entry, and select if you want this version pushed to the catalog.

Next, navigate to the catalog in the left-hand navigation menu. From here, the tile to provision a Postgres database should now be visible if it has been successfully published from the previous step. I already have a PhotonOS tile in my catalog which is why you are seeing two entries. If you have not added any other blueprints, then the Postgres database will be the only one visible.

Click on the Request link in the tile to start a database deployment. Populate the necessary details. Take a note of the version number and ensure it matches the version number you provided when publishing to the catalog (I’ve gone through a few versions, so your number may be different). In this example, I need to provide a deployment name. The database name will be set to the same name as the deployment if not provided separately. This is done in the code. We can also check if the infrastructure policy list that we defined in the code is working as a dropdown list, as shown here.

You can also check that the Postgres Major numbers are working, by selecting a number outside the range. It should error as shown below. Similar behaviour should be visible in the major number inputted is less than the supported minimum:

With the details populated, click on the ‘SUBMIT’ button. From the Instances view (still under Build & Deploy), you should now see the database begin to deploy.

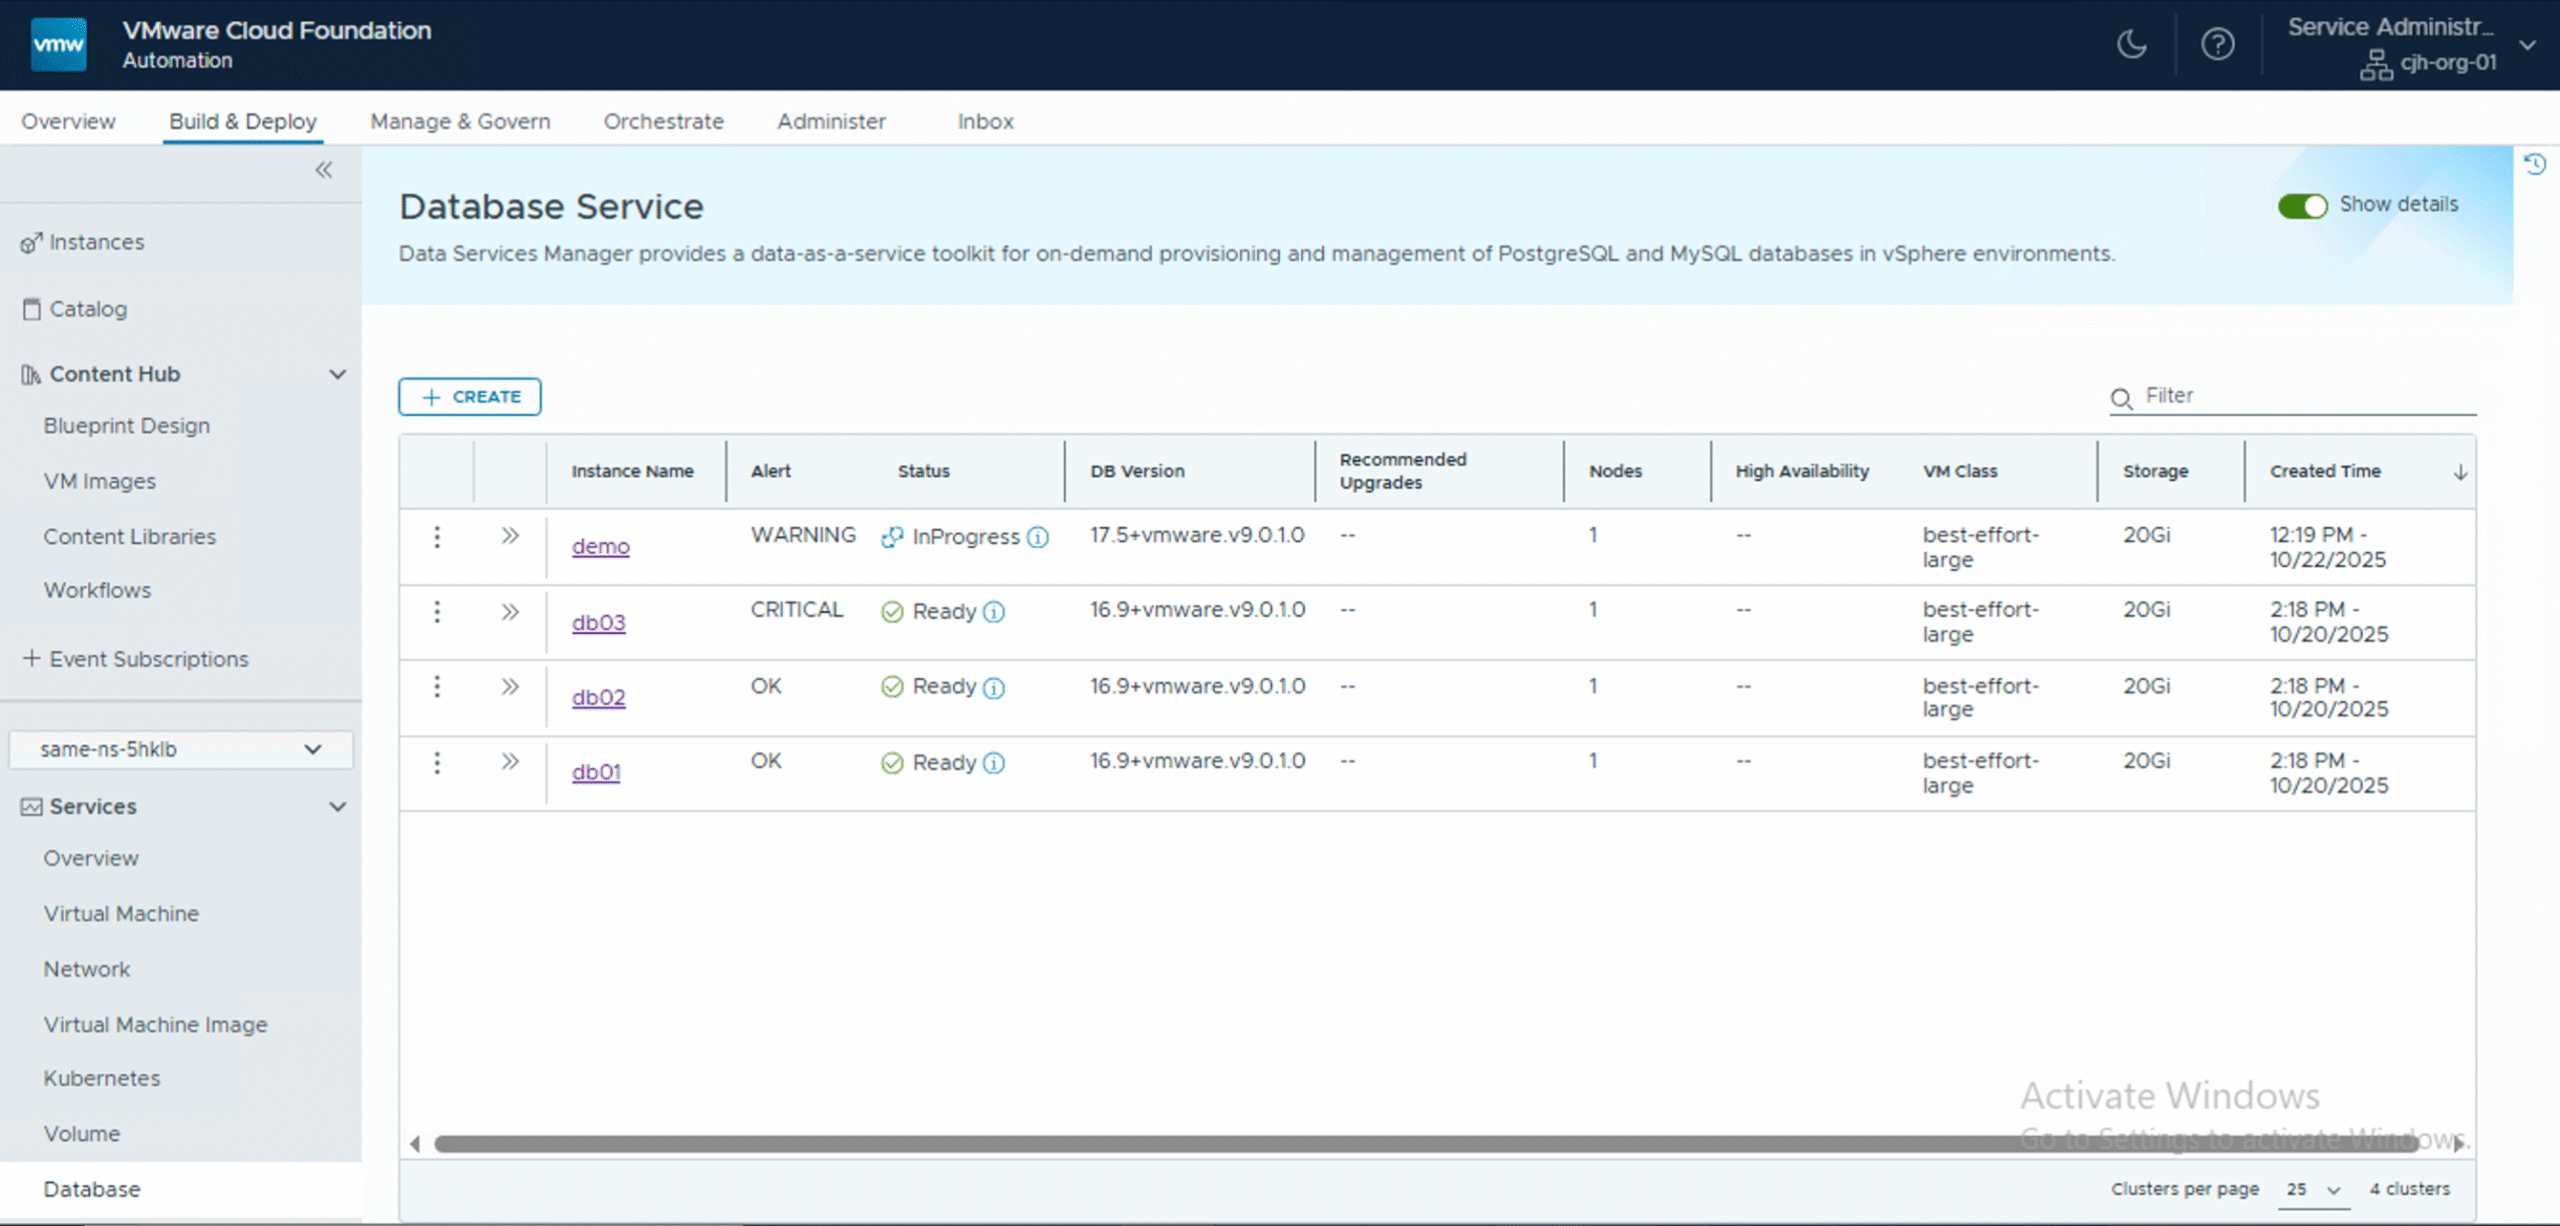
All going well, the database should also appear in the DSM UI:

And of course, it should also appear in the Databases view of the Namespace that was chosen for the provisioning. This is only true for Postgres database. As mentioned a few times now, MySQL is still not plumbed up into VCFA, but we do plan to have it included in a future release. From this screen, I can click on the database to see the full YAML manifest as well as retrieve the connection string for the database.
And that completes the deployment of a DSM Postgres database in VCFA using a blueprint template. And of course, you can repeat the same thing for MySQL and create a blueprint template for those database types as well. Then from the catalog, you may also request a MySQL database to be provisioned.

When the database is provisioned, you will see it in the “Instances” view, but you will not see it in the Databases view for the reasons mentioned previously. However, this might be a sufficient way to track MySQL deployments presently, without having to context switch into the DSM UI.

If you’d like to use the blueprints as a starting point, feel free to download them from this public Github repo.