DSM 9.0.1 – PostgreSQL HA & DR Improvements
![]() As the most popular DSM database, we always strive to improve our enterprise-ready version of PostgreSQL with each release. Data Services Manager v9.0.1 is no different. In this release, we have improved on the Disaster Recovery configuration. We want to enable Data Admins to seamlessly fail over and back between a Primary and a Secondary Postgres database, and make it easy to replicate in either direction. We also want this to occur without needing a full resync of the data. In this blog post, I will take a closer look at this new feature and describe the steps needed to have a successful “planned promotion” of a secondary to a primary. Similar steps will be followed in the case of an actual Disaster Recovery (DR) scenario.
As the most popular DSM database, we always strive to improve our enterprise-ready version of PostgreSQL with each release. Data Services Manager v9.0.1 is no different. In this release, we have improved on the Disaster Recovery configuration. We want to enable Data Admins to seamlessly fail over and back between a Primary and a Secondary Postgres database, and make it easy to replicate in either direction. We also want this to occur without needing a full resync of the data. In this blog post, I will take a closer look at this new feature and describe the steps needed to have a successful “planned promotion” of a secondary to a primary. Similar steps will be followed in the case of an actual Disaster Recovery (DR) scenario.
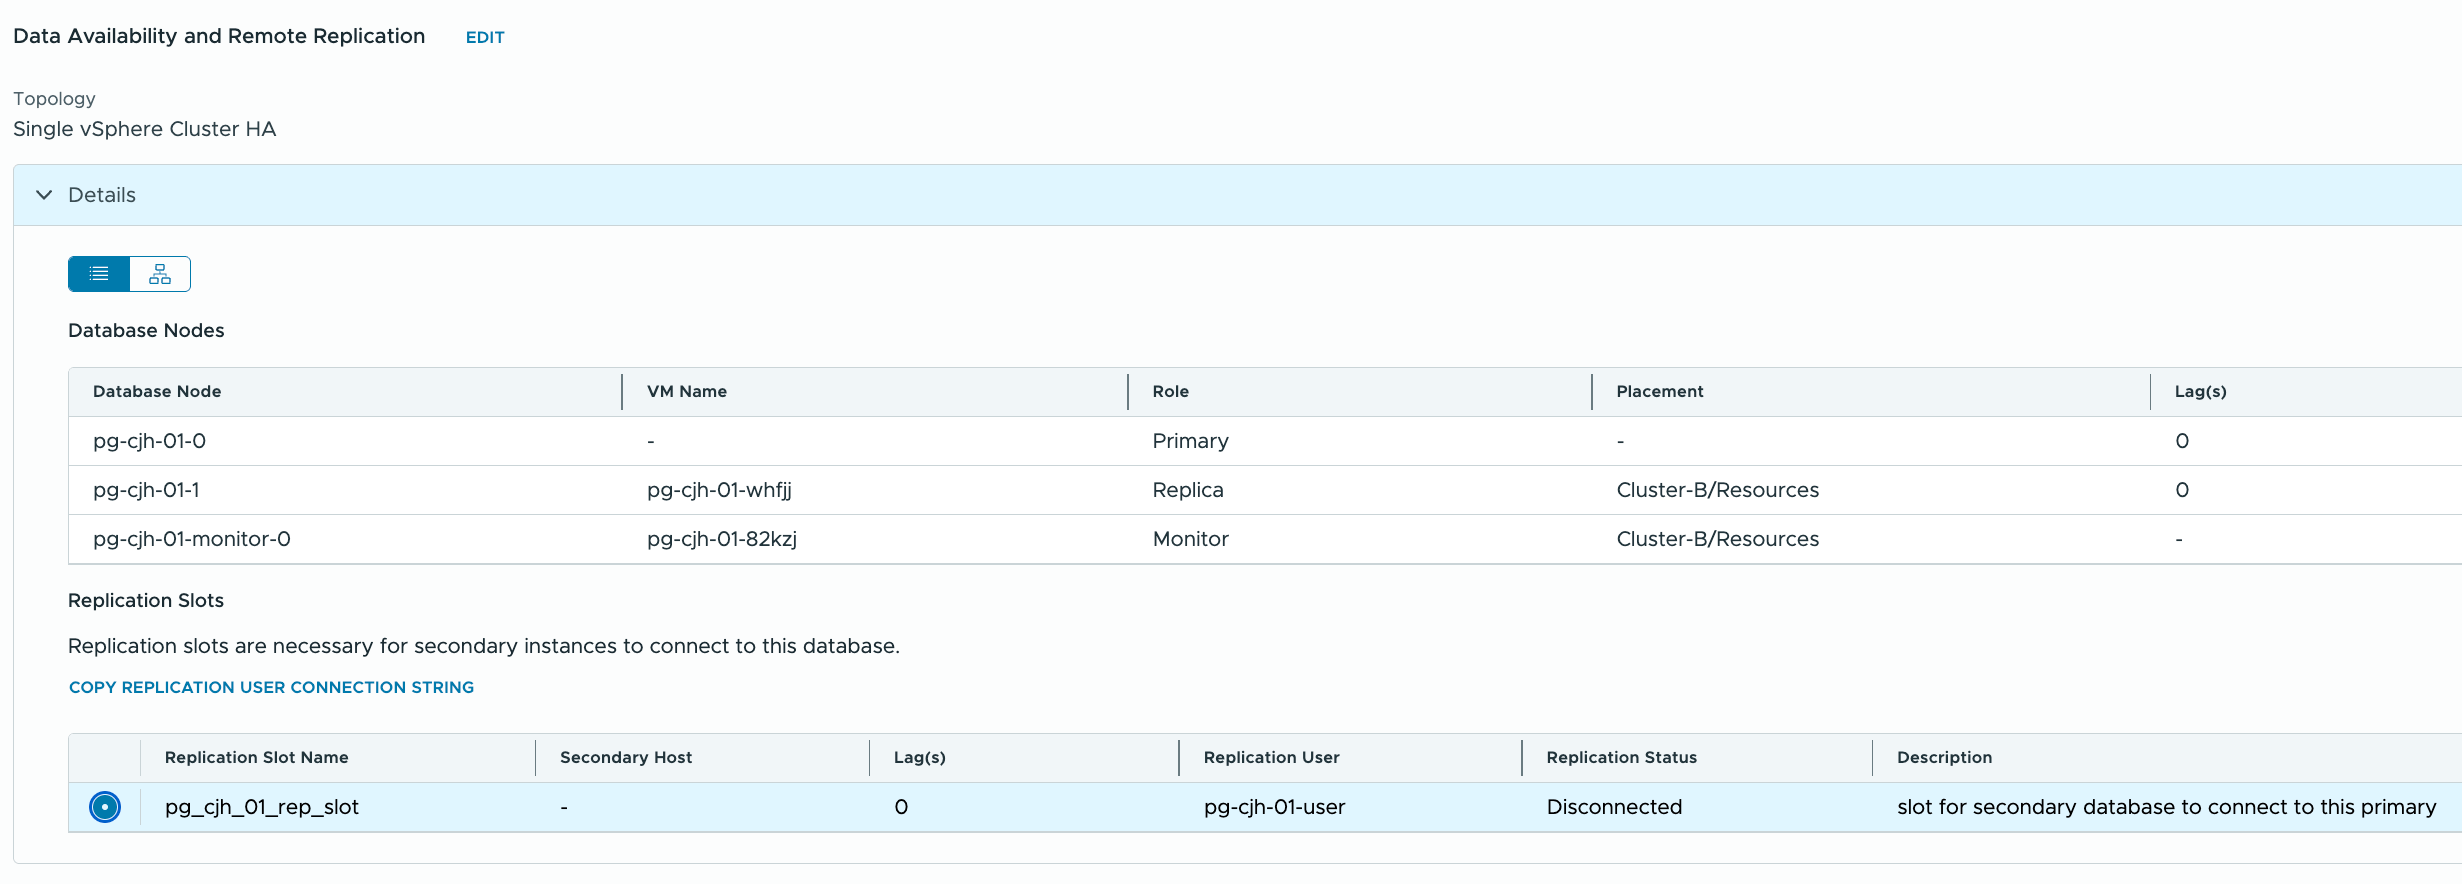
Let’s begin by creating a clustered Postgres database (3 nodes). To achieve the maximum availability, these database nodes are automatically placed on different ESXi hosts. In environments where there are multiple vSphere clusters available in an infrastructure policy, we provide the capability to place the database nodes on separate vSphere clusters. And of course, for DR purposes, we allow replication to a secondary Postgres database. For this replication, an admin needs to create a replica slot and replica user on the primary database so that the secondary can connect and replicate. This is the slot and user which I created for the purposes of this demonstration:

Once the primary Postgres database has been successfully created, make a copy of the ‘Replication user Connection String’. This will be need when the Secondary Postgres database is created. Make a note of the slot name as well. Note that the replication status is currently disconnected, as shown below.
When creating the secondary Postgres instance, provide both the replication user string and slot name in the ‘Data Protection’ section, as shown here:

Ensure that you add the same advanced parameters and host based authentication (HBA) parameters when configuring the secondary. Note that these parameters and settings are not replicated as part of the ‘Data Protection’. It is only the contents of the database that are replicated.
Once the secondary database is deployed and replicating, the primary will report a replicating status. It will also show details of the secondary and any lag in the replication.

We can now look at some of the new replication features of Postgres in DSM 9.0.1. In this example, we will look at the ‘Planned Promotion’ workflow to see these enhancements in more detail.
Block Database Connections
The first new feature is the ability to block database connections. This can be very useful during a controlled or scheduled failover, for maintenance or other such reasons. It will disconnect current connections to the database and prevent new one. This action stops any updates to the database during a failover to the secondary instance. Click on the “Actions” and select “Block Database Connections”. This may take a moment or so as the pg_hba.conf file, which controls access to the database, is updated and applied to the database.

The DSM UI highlights that connections are blocked:

Any current connections get dropped:
FATAL:  terminating connection due to administrator command
SSL connection has been closed unexpectedly
Any further attempts to connect to the database will be met with the following error:
connection to server at "xxxx", port 5432 failed: FATAL: pg_hba.conf rejects connection for host
Promote Secondary Database
With connections blocked on the Primary, we can now promote the secondary to a primary. Click on the Actions drop-down for the secondary and select the “Promote Database” option:

This opens the ‘Promote database’ workflow. From here you can select a Disaster Recover workflow or a Planned Promotion workflow. We are selecting the ‘Planned Promotion’ workflow in this case since we can still communicate with the original primary database.

Note that there are two prerequisites with the Planned Promotion. The first is to make sure that the connections to the primary database are blocked, which they are. The second requirement is to make sure that the primary database is ready for promotion.
Now if I wish to reverse the replication process, and have my new primary (former secondary) synchronize to my new secondary (formerly primary), I can put the necessary configuration in place during the Planned Promotion workflow. To allow this replication to occur, provide replication user and slot details for the new primary database.

The new primary now has its own replication information. This can now be copied and used to setup replication in the other direction when the original primary database is demoted to a secondary. We will see how to do that next.

Demote the original Primary Database to Secondary
We an now demote the original primary database to be a secondary database using another option in the drop-down menu. We can capture the replication information from the new primary and use it to sync in the other direction once this database (original primary, now secondary) is demoted. Here is how to do this, where you have to acknowledge what happens if there are two primaries, as well as provide the replication user connection string and slot name from the new primary:

Resume Database Connections
At this point, once replicated has been configured, everything should be up and running. However, the secondary (the original primary) still has its database connections blocked. This will also block replication. Simply resume those connections to enable replication in the opposite direction to what it was before.

You have now successfully completed a planned failover between a primary and secondary Postgres database. With the replication strings and slots now defined on the primary and the secondary, you can repeat future planned promotion failovers and re-use the settings without having to reconfigure these options again. And more importantly, it is not necessary to do a full resync of the data when there is a failover/failback operation.
One word of caution: As shown above, if you do a switchover in one direction (failover), then you can repeat it in the other direction (failback). But note that we do not currently support promoting a secondary to a primary and then immediately demoting it back to being a secondary without the former primary being demoted to the newly promoted secondary first.
To be clear, when you perform switchover and failback, these are the simplified steps:
Initial:   A(primary)   => B(secondary)
Block A
Promote B: A(primary)      B(primary)
Demote A:  A(secondary) <= B(primary)
--
Block B
Promote A: A(primary)      B(primary)
Demote B:  A(primary)   => B(secondary)
What you cannot do is support a partially executed switchover workflows. So you cannot do the following:
Initial:   A(primary)   => B(secondary)
Block A
Promote B: A(primary)      B(primary)
Demote B:  x
This is something to keep in mind during failover / failback testing.