Deploying a monitoring stack (Prometheus and Grafana) on TKG v1.4 with External-DNS
 Many customers who have deployed Tanzu Kubernetes would like to monitor activity on the cluster. In TKG v1.4, VMware provides all of the packages one would required to setup a full monitoring stack using Prometheus and Grafana. Prometheus records real-time metrics and Grafana provides charts, graphs, and alerts when connected to a supported data source, such as Prometheus. Prometheus has a dependency on an Ingress, which we will provide through the Contour controller package (which includes an Envoy Ingress). In fact, Prometheus leverages a special kind of Ingress called a HTTPProxy which is provided with Contour. We are also going to install the Cert-Manager package, although it is optional. The Cert-Manager can provide for secure communication between Contour and Envoy. Another optional package is External-DNS, which we will deploy to integrate the Prometheus and Grafana FQDNs into our Microsoft DNS. There is quite a lot here, but don’t worry – the deployment is quite straight-forward. In this post, we will see how Prometheus and Grafana can be used to monitor a TKG cluster, and also how to integrate these apps with an external DNS provider.
In this setup, there is an existing deployment of both a TKG management cluster and a workload cluster. The deployment is to vSphere 7.0U2c using NSX ALB version 2.0.1.5 to provide Load Balancer services to the cluster.. The clusters are integrated with LDAP (MS Active Directory) through the use of Pinniped and Dex. Deployment of TKG, NSX-ALB and LDAP integrations are not shown in this post, but you can find this details on how to do this in other posts on this site. This environment also has an external DNS server (Microsoft DNS), which provides lookup services for both the vSphere infrastructure and workloads. This will be leveraged to add DNS records for the Prometheus and Grafana applications, both of which have an FQDN requirement. We will be deploying onto the workload cluster.
Whilst External-DNS can be integrated with many DNS providers, there are a few caveats when integrating with Microsoft DNS. First, we need to allow both secure and non-secure dynamic updates, and second, we need to configure it to allow zone transfers “to any server”. Zone transfers are needed for the deletion of records. Here are screenshots from the properties of my Microsoft DNS rainpole.com domain’s properties:
 |
2. Deploy Cert Manager
Cert Manager is an optional package, but we shall install it anyway to make the monitoring app stack more secure. We will use it to secure communications between Contour and the Envoy Ingress. Cert-manager automates certificate management. There is no requirement to supply any bespoke data values for the Cert Manager. The only configuration option is the namespace in which to deploy cert-manager (default: tanzu-certificates). Use the following commands to check which versions of the Cert Manager package are available for installation, and install the package.
$ tanzu package available list cert-manager.tanzu.vmware.com
- Retrieving package versions for cert-manager.tanzu.vmware.com...
  NAME                           VERSION               RELEASED-AT
  cert-manager.tanzu.vmware.com  1.1.0+vmware.1-tkg.2  2020-11-24T18:00:00Z


$ tanzu package install cert-manager -p cert-manager.tanzu.vmware.com --version 1.1.0+vmware.1-tkg.2
/ Installing package 'cert-manager.tanzu.vmware.com'
| Getting namespace 'default'
| Getting package metadata for 'cert-manager.tanzu.vmware.com'
| Creating service account 'cert-manager-default-sa'
| Creating cluster admin role 'cert-manager-default-cluster-role'
| Creating cluster role binding 'cert-manager-default-cluster-rolebinding'
- Creating package resource
| Package install status: Reconciling

 Added installed package 'cert-manager' in namespace 'default'


$ tanzu package installed list
/ Retrieving installed packages...
  NAME          PACKAGE-NAME                   PACKAGE-VERSION       STATUS
  cert-manager  cert-manager.tanzu.vmware.com  1.1.0+vmware.1-tkg.2  Reconcile succeeded


$ kubectl get apps
NAME            DESCRIPTION            SINCE-DEPLOY AGE
cert-manager    Reconcile succeeded    54s          60s
3. Install Contour
The next step is to install the Contour Ingress controller, which uses Envoy to provide a special Ingress called HTTPProxy. We need to make some changes to the default deployment to tell it that the Envoy service should use a LoadBalancer service, and also to use Cert Manager for TLS certificates. These directives can be seen in the contour-simple.yaml manifest shown below, and also how to include them in the deployment through the –values-file option in the install command. Note that Contour needs to be installed before External-DNS to enable Contour HTTPProxy support. If Contour is not installed before External-DNS, it won’t be possible to use HTTPProxy as a source in the External-DNS configuration later on.
$ cat contour-simple.yaml
envoy:
  service:
    type: LoadBalancer
certificates:
  useCertManager: true


$ tanzu package available list contour.tanzu.vmware.com
- Retrieving package versions for contour.tanzu.vmware.com...
NAME                      VERSION                RELEASED-AT
contour.tanzu.vmware.com  1.17.1+vmware.1-tkg.1  2021-07-23T18:00:00Z


$ tanzu package install contour -p contour.tanzu.vmware.com --version 1.17.1+vmware.1-tkg.1 --values-file contour-simple.yaml
/ Installing package 'contour.tanzu.vmware.com'
| Getting namespace 'default'
| Getting package metadata for 'contour.tanzu.vmware.com'
| Creating service account 'contour-default-sa'
| Creating cluster admin role 'contour-default-cluster-role'
| Creating cluster role binding 'contour-default-cluster-rolebinding'
| Creating secret 'contour-default-values'
- Creating package resource
\ Package install status: Reconciling

 Added installed package 'contour' in namespace 'default'


$ tanzu package installed list
- Retrieving installed packages...
  NAME          PACKAGE-NAME                   PACKAGE-VERSION        STATUS
  cert-manager  cert-manager.tanzu.vmware.com  1.1.0+vmware.1-tkg.2   Reconcile succeeded
  contour       contour.tanzu.vmware.com       1.17.1+vmware.1-tkg.1  Reconcile succeeded


$ kubectl get apps
NAME           DESCRIPTION          SINCE-DEPLOY   AGE
cert-manager   Reconcile succeeded  58s            5m59s
contour        Reconcile succeeded  76s            81s
4. Install External-DNS
The External-DNS package will integrate the TKG cluster with our external DNS source. This means that the FQDNs that we choose for applications such as Prometheus and Grafana will be automatically added to our external DNS source. To integrate with Microsoft DNS, the RFC2136 provider is chosen. This allows any RFC2136-compatible DNS servers to be used as a provider for External-DNS, such as Microsoft DNS. As mentioned, I am integrating with my rainpole.com domain. Note that External-DNS only supports Microsoft DNS via insecure updates, thus the inclusion of the rfc2136-insecure argument (support insecure dynamic updates) and the rfc2136-tsig-axfr (support zone transfers). Note also the use of TXT registry. As per this note, attempting to use a CNAME with a TXT registry, the –txt-prefix= must be set to avoid records using the same name. This External-DNS is configured for Service, Ingress and HTTPProxy sources. All of these settings are placed in a values file and passed in as the package is installed.
$ cat external-dns.yaml
namespace: tanzu-system-service-discovery
deployment:
args:
- --registry=txt
- --txt-prefix=external-dns-
- --txt-owner-id=tanzu
- --provider=rfc2136
- --rfc2136-host=xx.xx.51.252
- --rfc2136-port=53
- --rfc2136-zone=rainpole.com
- --rfc2136-insecure
- --rfc2136-tsig-axfr
- --source=service
- --source=contour-httpproxy
- --source=ingress
- --domain-filter=rainpole.com


$ tanzu package available list external-dns.tanzu.vmware.com
/ Retrieving package versions for external-dns.tanzu.vmware.com...
  NAME                           VERSION               RELEASED-AT
  external-dns.tanzu.vmware.com  0.8.0+vmware.1-tkg.1  2021-06-11T18:00:00Z


$ tanzu package install external-dns -p external-dns.tanzu.vmware.com -v 0.8.0+vmware.1-tkg.1 --values-file external-dns.yaml
\ Installing package 'external-dns.tanzu.vmware.com'
| Getting namespace 'default'
| Getting package metadata for 'external-dns.tanzu.vmware.com'
| Creating service account 'external-dns-default-sa'
| Creating cluster admin role 'external-dns-default-cluster-role'
| Creating cluster role binding 'external-dns-default-cluster-rolebinding'
| Creating secret 'external-dns-default-values'
- Creating package resource
/ Package install status: Reconciling

 Added installed package 'external-dns' in namespace 'default'


$ tanzu package installed list
- Retrieving installed packages...
  NAME          PACKAGE-NAME                   PACKAGE-VERSION        STATUS
  cert-manager  cert-manager.tanzu.vmware.com  1.1.0+vmware.1-tkg.2   Reconcile succeeded
  contour       contour.tanzu.vmware.com       1.17.1+vmware.1-tkg.1  Reconcile succeeded
  external-dns  external-dns.tanzu.vmware.com  0.8.0+vmware.1-tkg.1   Reconcile succeeded


$ kubectl  get apps
NAME           DESCRIPTION           SINCE-DEPLOY   AGE
cert-manager   Reconcile succeeded   44s            9m41s
contour        Reconcile succeeded   58s            5m3s
external-dns   Reconcile succeeded   30s            92s
5. Verify External-DNS Deployment
$ kubectl get pods -n tanzu-system-service-discovery
NAME READY STATUS RESTARTS AGE
external-dns-c59745fc6-xhzzj 1/1 Running 0 8m33s


$ kubectl logs external-dns-c59745fc6-xhzzj -n tanzu-system-service-discovery
.
.
time="2021-12-07T09:01:42Z" level=info msg="Instantiating new Kubernetes client"
time="2021-12-07T09:01:42Z" level=info msg="Using inCluster-config based on serviceaccount-token"
time="2021-12-07T09:01:42Z" level=info msg="Created Kubernetes client https://100.64.0.1:443"
time="2021-12-07T09:01:43Z" level=info msg="Created Dynamic Kubernetes client https://100.64.0.1:443"
time="2021-12-07T09:01:45Z" level=info msg="Configured RFC2136 with zone 'rainpole.com.' and nameserver '10.27.51.252:53'"
6. Deploy Prometheus
The next step is to deploy Prometheus, which will record real-time metrics from the TKG cluster in a time-series database. In this setup, Prometheus is configured to enable the use of an Ingress (or rather a HTTPProxy), and is also provided with an FDQN that is part of this DNS domain – prometheus.rainpole.com. These settings are included in the Prometheus values file. If all is working after the deployment, we should be able to access the Prometheus dashboard using the FQDN, and resolve it using tools such as nslookup.
$ cat prometheus.yaml
ingress:
  enabled: true
  virtual_host_fqdn: "prometheus.rainpole.com"
  prometheus_prefix: "/"
  alertmanager_prefix: "/alertmanager/"
  prometheusServicePort: 80
  alertmanagerServicePort: 80


$ tanzu package available list prometheus.tanzu.vmware.com
- Retrieving package versions for prometheus.tanzu.vmware.com...
  NAME                        VERSION                RELEASED-AT
  prometheus.tanzu.vmware.com  2.27.0+vmware.1-tkg.1  2021-05-12T18:00:00Z


$ tanzu package install prometheus --package-name prometheus.tanzu.vmware.com --version 2.27.0+vmware.1-tkg.1 --values-file prometheus.yaml
| Installing package 'prometheus.tanzu.vmware.com'
- Installing package 'prometheus.tanzu.vmware.com'
| Getting namespace 'default'
| Getting package metadata for 'prometheus.tanzu.vmware.com'
| Creating service account 'prometheus-default-sa'
| Creating cluster admin role 'prometheus-default-cluster-role'
| Creating cluster role binding 'prometheus-default-cluster-rolebinding'
| Creating secret 'prometheus-default-values'
- Creating package resource
\ Package install status: Reconciling

 Added installed package 'prometheus' in namespace 'default'


$ tanzu package installed list
/ Retrieving installed packages...
  NAME          PACKAGE-NAME                   PACKAGE-VERSION        STATUS
  cert-manager  cert-manager.tanzu.vmware.com  1.1.0+vmware.1-tkg.2   Reconcile succeeded
  contour       contour.tanzu.vmware.com       1.17.1+vmware.1-tkg.1  Reconcile succeeded
  external-dns  external-dns.tanzu.vmware.com  0.8.0+vmware.1-tkg.1   Reconcile succeeded
  prometheus    prometheus.tanzu.vmware.com    2.27.0+vmware.1-tkg.1  Reconcile succeeded


$ kubectl get apps
NAME          DESCRIPTION          SINCE-DEPLOY  AGE
cert-manager  Reconcile succeeded  56s            53m
contour       Reconcile succeeded  25s            48m
external-dns  Reconcile succeeded  35s            45m
prometheus    Reconcile succeeded  104s          108s


$ kubectl get httpproxy -A
NAMESPACE                NAME                  FQDN                      TLS SECRET      STATUS  STATUS DESCRIPTION
tanzu-system-monitoring  prometheus-httpproxy  prometheus.rainpole.com  prometheus-tls  valid    Valid HTTPProxy


$ nslookup prometheus.rainpole.com
Server: 127.0.0.53
Address: 127.0.0.53#53

Non-authoritative answer:
Name: prometheus.rainpole.com
Address: xx.xx.62.25
7. Verify Prometheus DNS records added
If the nslookup succeeds, then the external DNS has been successfully updated. It should be possible to see the DNS records get updated via the logs of the external-dns pod. The –txt-prefix set in the configuration has ensured that we get two different names for the A and TXT records, and that there is no clash of names.
time="2021-12-07T09:46:10Z" level=info msg="Adding RR: prometheus.rainpole.com 0 A xx.xx.62.25"
time="2021-12-07T09:46:10Z" level=info msg="Adding RR: external-dns-prometheus.rainpole.com 0 TXT \"heritage=external-dns,external-dns/owner=tanzu,external-dns/resource=HTTPProxy/tanzu-system-monitoring/prometheus-httpproxy\""
It should now be possible to see the DNS A and TXT records in the Microsoft DNS. At this point, it should also be possible to connect to the Prometheus dashboard using the FQDN, in my example prometheus.rainpole.com.
8. Deploy Grafana
We now come to the last part of the setup of a monitoring stack on TKG, and that is the deployment of Grafana. Grafana provides charts, graphs, and alerts when connected to a supported data source, Through the tanzu package mechanism, we can connect Grafana directly to the Prometheus data source configured previously. We will also configure it to use an HTTPProxy and provide the FQDN so that it is automatically added to our external DNS.
$ cat grafana.yaml
grafana:
  config:
    datasource_yaml: |-
      apiVersion: 1
      datasources:
        - name: Prometheus
          type: prometheus
          url: prometheus-server.tanzu-system-monitoring.svc.cluster.local
          access: proxy
          isDefault: true
namespace: tanzu-system-dashboard
ingress:
  virtual_host_fqdn: "grafana.rainpole.com"


$ tanzu package available list grafana.tanzu.vmware.com
| Retrieving package versions for grafana.tanzu.vmware.com...
  NAME                      VERSION              RELEASED-AT
  grafana.tanzu.vmware.com  7.5.7+vmware.1-tkg.1  2021-05-19T18:00:00Z


$ tanzu package install grafana -p grafana.tanzu.vmware.com -v 7.5.7+vmware.1-tkg.1 --values-file grafana.yaml
- Installing package 'grafana.tanzu.vmware.com'
| Getting namespace 'default'
| Getting package metadata for 'grafana.tanzu.vmware.com'
| Creating service account 'grafana-default-sa'
| Creating cluster admin role 'grafana-default-cluster-role'
| Creating cluster role binding 'grafana-default-cluster-rolebinding'
| Creating secret 'grafana-default-values'
- Creating package resource
\ Package install status: Reconciling

 Added installed package 'grafana' in namespace 'default'


$ tanzu package installed list
/ Retrieving installed packages...
  NAME          PACKAGE-NAME                   PACKAGE-VERSION        STATUS
  cert-manager  cert-manager.tanzu.vmware.com  1.1.0+vmware.1-tkg.2   Reconcile succeeded
  contour       contour.tanzu.vmware.com       1.17.1+vmware.1-tkg.1  Reconcile succeeded
  external-dns  external-dns.tanzu.vmware.com  0.8.0+vmware.1-tkg.1   Reconcile succeeded
  grafana       grafana.tanzu.vmware.com       7.5.7+vmware.1-tkg.1   Reconcile succeeded
  prometheus    prometheus.tanzu.vmware.com    2.27.0+vmware.1-tkg.1  Reconcile succeeded


$ kubectl get apps
NAME           DESCRIPTION          SINCE-DEPLOY  AGE
cert-manager   Reconcile succeeded  73s            76m
contour        Reconcile succeeded  41s            71m
external-dns   Reconcile succeeded  41s            68m
grafana        Reconcile succeeded  43s            3m6s
prometheus     Reconcile succeeded  21s            24m


$ kubectl get httpproxy -A
NAMESPACE                 NAME                   FQDN                      TLS SECRET       STATUS   STATUS DESCRIPTION
tanzu-system-dashboard    grafana-httpproxy      grafana.rainpole.com      grafana-tls      valid    Valid  HTTPProxy
tanzu-system-monitoring   prometheus-httpproxy   prometheus.rainpole.com   prometheus-tls   valid    Valid  HTTPProxy


$ nslookup grafana.rainpole.com
Server: 127.0.0.53
Address: 127.0.0.53#53

Non-authoritative answer:
Name: grafana.rainpole.com
Address: xx.xx.62.25
9. Verify Grafana DNS records added
Once again, if the nslookup succeeds, then the external DNS has been successfully updated. It should once more be possible to see the DNS records get updated via the logs of the external-dns pod.
time="2021-12-07T10:07:23Z" level=info msg="Adding RR: grafana.rainpole.com 0 A 10.27.62.25"
time="2021-12-07T10:07:23Z" level=info msg="Adding RR: external-dns-grafana.rainpole.com 0 TXT \"heritage=external-dns,external-dns/owner=tanzu,external-dns/resource=HTTPProxy/tanzu-system-dashboard/grafana-httpproxy\""
10. Access the Grafana Dashboard
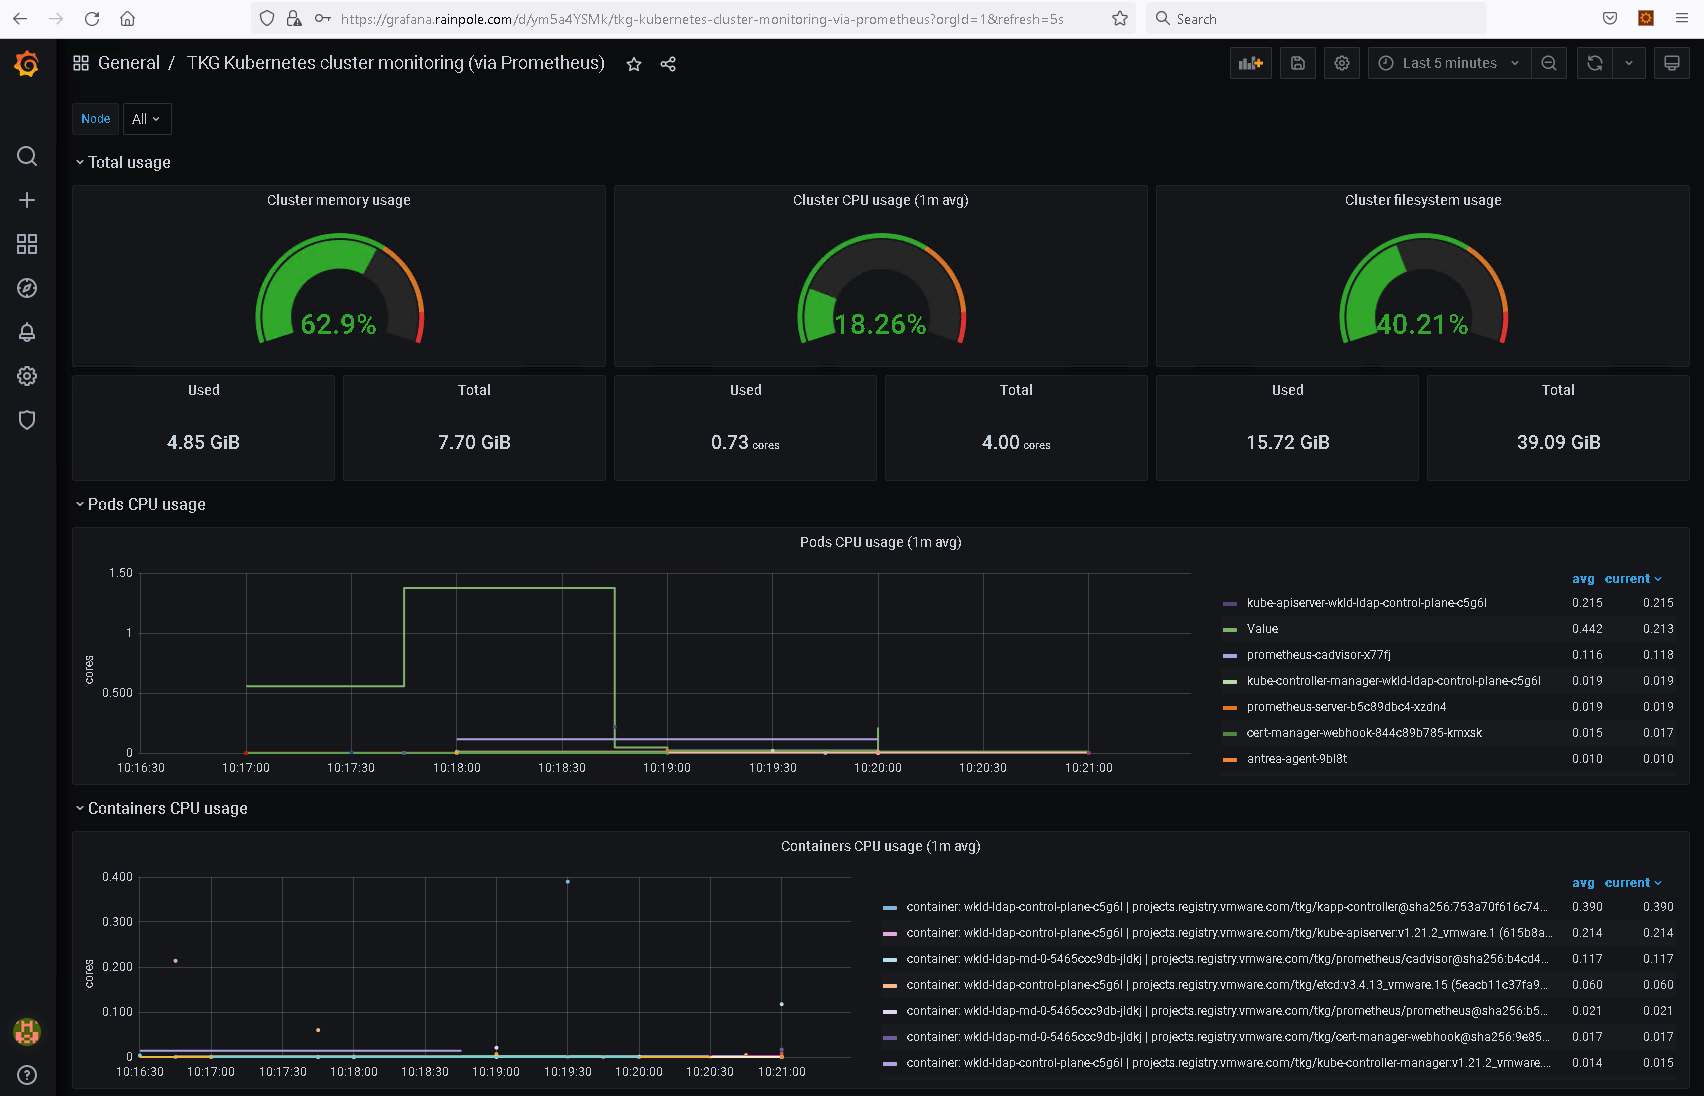
Grafana should now be operational. Open a browser and point it at the Grafana FQDN, in my case grafana.rainpole.com. You should be see the Grafana login appear. The default credentials are admin/admin, but you will be prompted to provide a new password after initial login. From the left hand menu, select Dashboards, then Manage. Two dashboard should be available for selection: Kubernetes / API server and TKG Kubernetes cluster monitoring (via Prometheus). Select the latter, and you should begin to see some K8s metrics visualized, as shown below.
Conclusion
That completes the setup. You now have Prometheus and Grafana working together to provide insights into your TKG cluster. Hopefully this has given you a good idea behind the power and simplicity of the Carvel packages available in TKG. You could of course do more bespoke configurations for each of the packages, but the purpose of this post was just to get you up and running as quickly as possible with the monitoring packages. Hope you found it useful.