DSM 9.0.2 – New Microsoft SQL Server Enhancements – SQL Server Agent Support
![]() VMware Data Service Manager 9.0.2.0 has achieved General Availability (GA) status, and is now readily accessible from the Broadcom Download Portal. You can see the full DSM 9.0.2 release notes here. In this post, I want to revisit our efforts to deliver a Microsoft SQL Server data service. As mentioned in a number of previous posts, we continue to work towards a fully supported Microsoft SQL Server data service in DSM. And whilst we do not have a generally available, supported release of this service in DSM version 9.0.2, we have made some significant enhancements once again in this release. In this version of DSM, we introduce support for SQL Server Agent. Many of our customers who have been participating in the design of this service have shared with us the importance of having SQL Server Agent support. It is a common way to run and schedule tasks on the instance and databases. In this post, I will show you how you can pass configuration parameters to the SQL Server Agent when provisioning a SQL Server instance via Data Services Manager. Then we can look at how we can use it run run and also schedule some jobs.
VMware Data Service Manager 9.0.2.0 has achieved General Availability (GA) status, and is now readily accessible from the Broadcom Download Portal. You can see the full DSM 9.0.2 release notes here. In this post, I want to revisit our efforts to deliver a Microsoft SQL Server data service. As mentioned in a number of previous posts, we continue to work towards a fully supported Microsoft SQL Server data service in DSM. And whilst we do not have a generally available, supported release of this service in DSM version 9.0.2, we have made some significant enhancements once again in this release. In this version of DSM, we introduce support for SQL Server Agent. Many of our customers who have been participating in the design of this service have shared with us the importance of having SQL Server Agent support. It is a common way to run and schedule tasks on the instance and databases. In this post, I will show you how you can pass configuration parameters to the SQL Server Agent when provisioning a SQL Server instance via Data Services Manager. Then we can look at how we can use it run run and also schedule some jobs.
The story so far …
By way of a recap, here is what we have delivered so far for the beta versions of MS SQL Server DSM data service:
- Click here for an overview of the original MS SQL Server tech preview release back in DSM 9.0.0.
- Click here and here for an overview of the MS SQL Server enhancements made in DSM 9.0.1, which include automated Active Directory integration and automatic DNS updates for MS SQL Server instances. This release also introduced an overview of the new RBAC mechanism based on Data Services Policies. These policies control user access to data services and resources.
Deploy MS SQL Server instance and user database
Let’s now take a look at the new SQL Server Agent support. I have already configured an Active Directory Domain for DSM. This allows me to create a privileged AD user account which can write SPNs (servicePrincipalNames). This in turn allows DSM to enable Windows Authentication for MS SQL Server database users. See the DSM 9.0.1 blog post mentioned previously for further details on this cool feature.

Next, we create an MS SQL Server instance or engine. I won’t repeat the steps here as they are very similar to how it is done in DSM version 9.0.1. However, there is a new section to enable SQL Server Agent. It also includes some configuration parameter around Job History when enabled. Later, we will create a job to see this in action.

Wait for the SQL Server instance to come online, verifying that Active Directory integration and automatic DNS updates are working correctly. This creates 4 System Databases on the MS SQL Server instance; master, model, msdb and tempdb. These are only accessible with administrator privileges. The details are available to the DSM admin when they view the summary page of the MS SQL Server instance, including a full connection string.

With the instance successfully deployed, we can create a user database on the instance. I am going to include a Windows Principal so that the user can use Windows Authentication to access the database. the format is ‘domain-name\user-name’.

After a few moment, the database will be online.

Now we can begin to look at the SQL Server Agent configuration and how we can use it to run some jobs.
Verify SQL Server Agent functionality
As part of this post, I am going to use some of the very popular scripts created by Ola Hallengren. The scripts are available here: https://ola.hallengren.com/downloads.html. In particular, I will look at the stored procedures that does database integrity checks. This is a stored procedure which we will install on the user database. First, we must installed another required stored procedure called CommandExecute.sql. We also need to run a script called CommandLog.sql to create a required table within the user database. Now we can run the DatabaseIntegrityCheck.sql stored procedure. Once this is completed, we can run the database integrity check.
After confirming that the stored procedure is working, we can then build a SQL Server Agent job to run the database integrity check, and modify the job to include a daily schedule to run it on a regular basis.
I am first going to login to the SQL Server as an administrator. The Admin login and password can be retrieved from the DSM UI, in the Summary view of the database instance.

Use this to login to the MS SQL Server Management Studio (SSMS) using SQL Server Authentication:

Let’s first check that the SQL Server Agent is running by opening a new query and running the following:
SELECT status_desc FROM sys.dm_server_services WHERE servicename LIKE 'SQL Server Agent%';
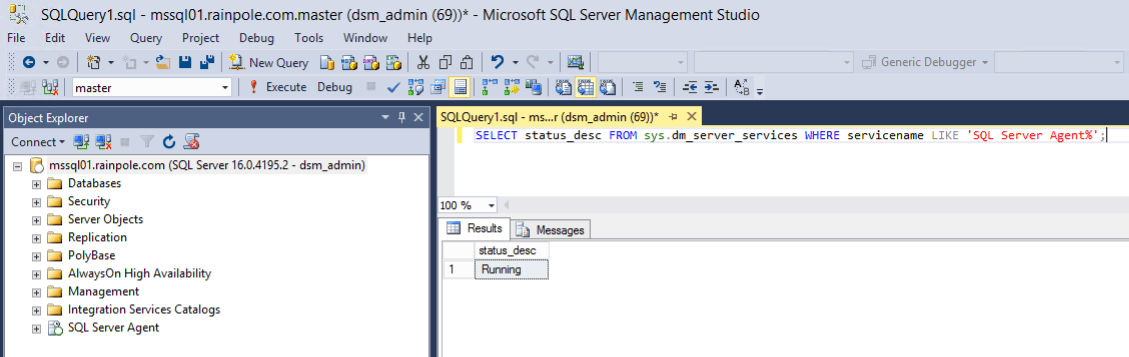
It appears to be running as expected. We can also check that the configuration values provided via the DSM UI for the SQL Server Agent have been implemented via the following command:
EXEC msdb.dbo.sp_get_sqlagent_properties;
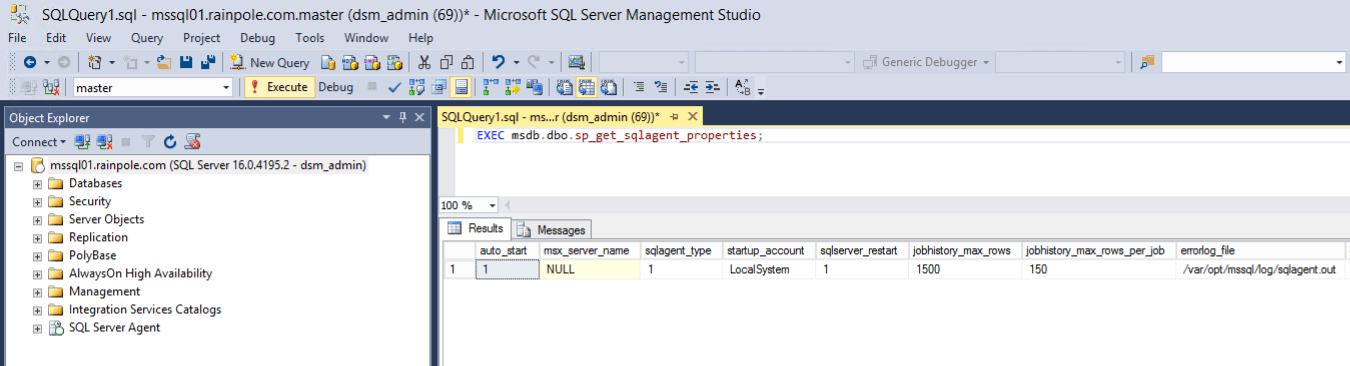
The max and min values of 1500 and 150 match the values that I provided during the deployment. So far, so good. Let’s now add the stored procedures on the user database for the integrity check.
Create Stored Procedure to do Database Integrity Checks
To add a stored procedure, select the user database (cormacdb01), and under Programmability, click on Stored Procedure > New > Stored Procedure, as shown below.

This will create a stored procedure template:

Replace the content of the stored procedure template with the Ola Hallengren scripts mentioned earlier, and execute them one at a time on the user database. Start with the CommandExecute script to build the CommandExecute procedure.
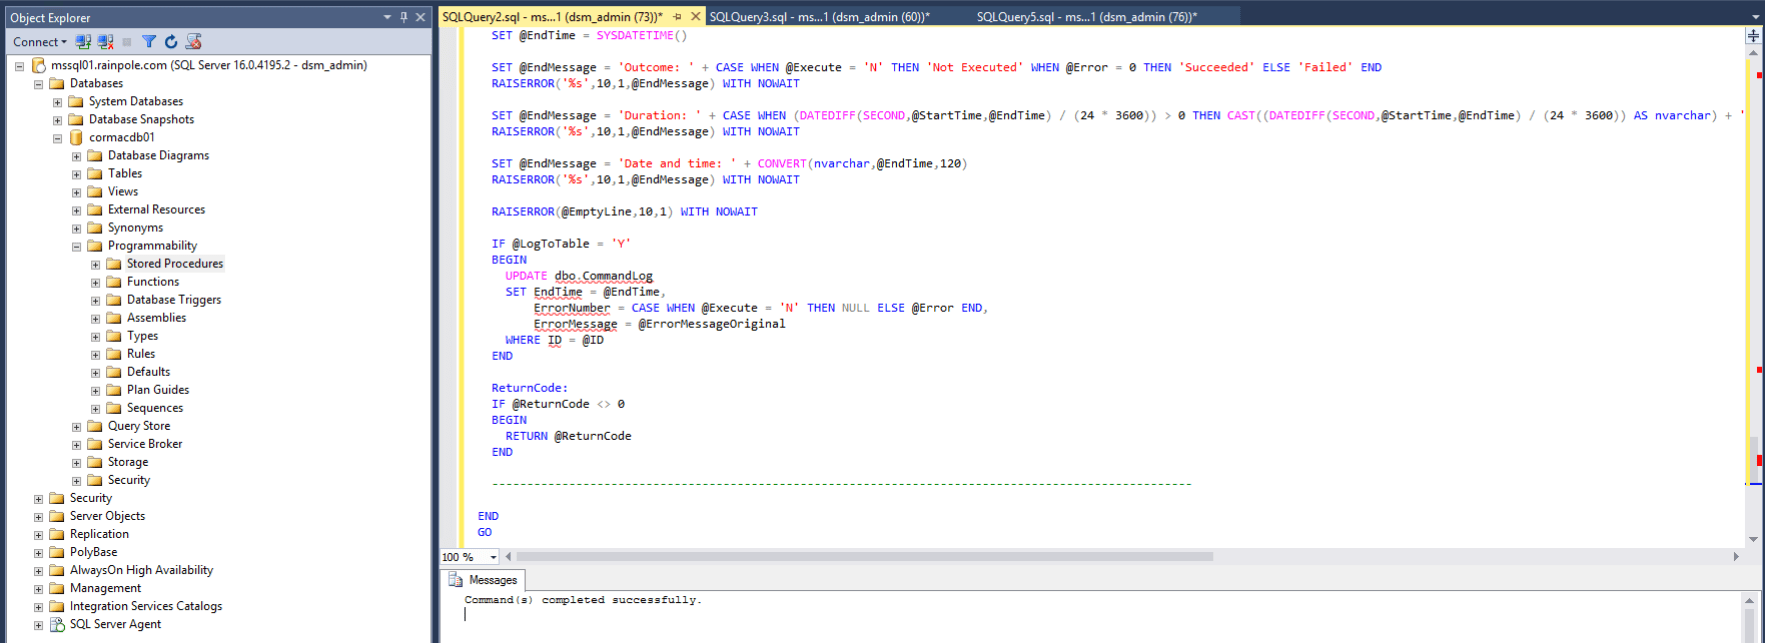
Next, open execute the CommandLog script to create the CommandLog table.
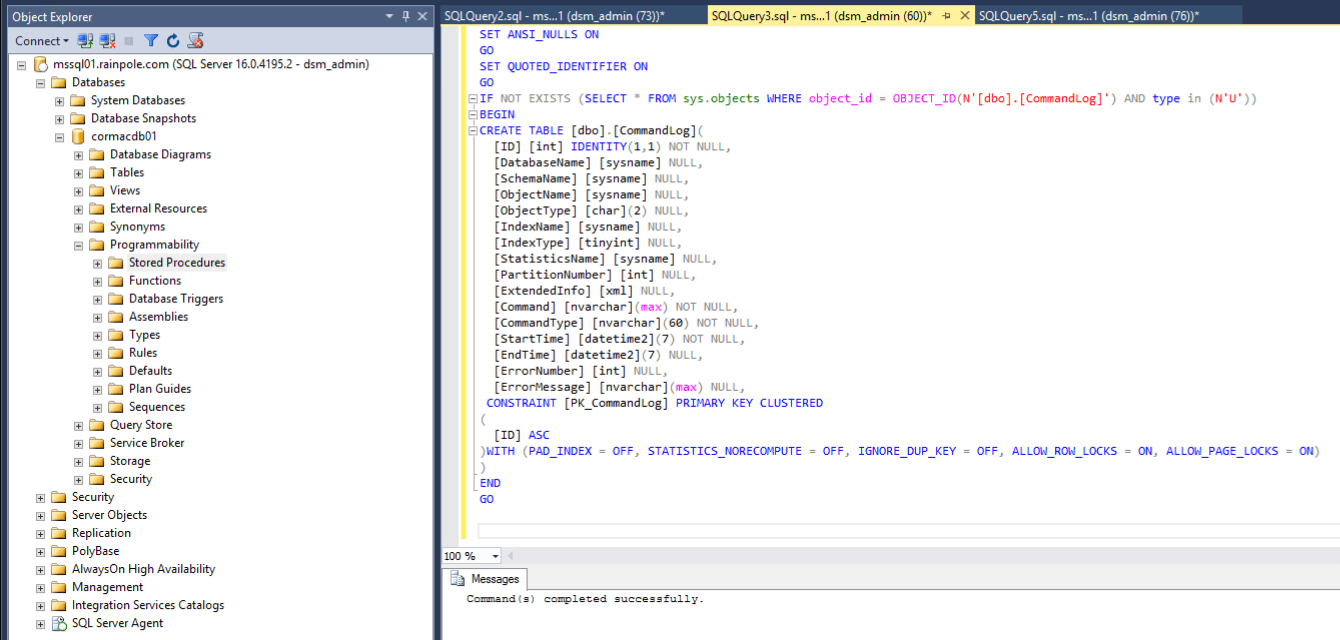
And finally execute the DatabaseIntegrityCheck script to create the Database Integrity Check procedure.

You can now run a command to verify that the database integrity check procedure is working. You can do this as the database owner, rather than the database admin. Logout from SSMS as the admin. Re-connect to the SSMS using the Windows Credentials of the owner, in this case ‘rainpole\cormac’. This is possible since we have given DSM the ability to automatically enable these logins through a privileged user account (see here) that we referenced when we created the database instance.

This user does not have access to any of the System database. The user only has access to its own user database. Since the SMSS connection always defaults to the ‘master’ database, we will need to change the database for this user to the user database (cormacdb01).

Once connected to the database, execute the following query on the user database, which is essentially running the procedure that we added earlier:
EXECUTE [dbo].[DatabaseIntegrityCheck] @Databases = 'USER_DATABASES', @LogToTable = 'Y';
You should observe the results of the integrity database check appear, reporting any issues with the database integrity:

Create a SQL Server Agent Job to do Database Integrity Checks
We will now create a SQL Server Agent job to run the database integrity checks. We can then add a schedule to it so that it checks the database integrity on a daily basis. Log out of the MS SQL Server Management Studio as the current Windows user and back in as the database admin using SQL Auth. Then run the following query to create the job. In the second EXEC, change the database_name to the name of the user database.
In a nutshell, we are creating a job called indexOptimize, and adding a step to the job to run the database integrity check on the user database. As this is run on the msdb, a system database, it can only be executed by the database admin.
USE msdb;
    EXEC msdb.dbo.sp_add_job @job_name = indexOptimize;
    EXEC msdb.dbo.sp_add_jobstep @job_name = IndexOptimize, @step_name = IndexOptimize, @database_name = <YOUR_DB_NAME>, @subsystem = N'TSQL', @command = 'EXECUTE [dbo].[DatabaseIntegrityCheck] @Databases = ''USER_DATABASES'', @LogToTable = ''Y'';';
    EXEC msdb.dbo.sp_add_jobserver @job_name = IndexOptimize, @server_name = N'(local)';

After running the above command, we should now see the job appear in the SQL Server Agent inventory view on the left hand view of the MS SQL Server Management Studio, as shown below.

Click on the job name (indexOptimize in this example) to see the job properties.

If you select the Steps page on the left hand side of the job properties, you can see a T-SQL type job step.

Click on the Edit underneath the Start Step in the job properties to verify that it is indeed a request to run the integrity check:

The job appears to have been successfully created.
Schedule a SQL Server Agent Job
Let’s now schedule this job to run regularly and report on the database integrity. Cancel the previous ‘Edit’ window to return back to the Job Properties. One of the pages listed in the left hand side is ‘Schedules’. Click on this to create a schedule for the job using the ‘New…’ button. In this case, I created a daily schedule for the integrity check.

With a schedule in place, we can check the job history and its runs using below command. You obviously won’t see any job runs reported until the job has run at least once.
EXEC msdb.dbo.sp_help_jobhistory @mode = 'FULL';
This is a sample of the output that the above command generates, showing multiple scheduled runs of the job:

Summary
And that completes the post demonstrating how SQL Server Agent support is now included in DSM 9.0.2 provisioned MS SQL Server instances. We continue to add features for MS SQL Server in each release, and we hope to make it generally available very soon indeed. If there are any questions around our Data Services Manager offering, or MS SQL Server integration, please reach out or leave a comment on the post.