A first look at VKSM Data Protection (VKSM DP)
![]() One of the new features in VCF Automation version 9.0.1 is a feature called vSphere Kubernetes Service Management, or VKSM for short. This gives users access to many additional capabilities, such as Data Protection, Policy Management and Add-on Management to improve the resiliency, security, and functionality of your VKS clusters. In this post, I wanted to take a look at the Data Protection capability (VKSM DP for short), as this is something I looked at quite closely in the past. To demonstrate, we will first configure a backup location, then enable Data Protection, then test a backup and restore of a namespace in a VKS cluster.
One of the new features in VCF Automation version 9.0.1 is a feature called vSphere Kubernetes Service Management, or VKSM for short. This gives users access to many additional capabilities, such as Data Protection, Policy Management and Add-on Management to improve the resiliency, security, and functionality of your VKS clusters. In this post, I wanted to take a look at the Data Protection capability (VKSM DP for short), as this is something I looked at quite closely in the past. To demonstrate, we will first configure a backup location, then enable Data Protection, then test a backup and restore of a namespace in a VKS cluster.
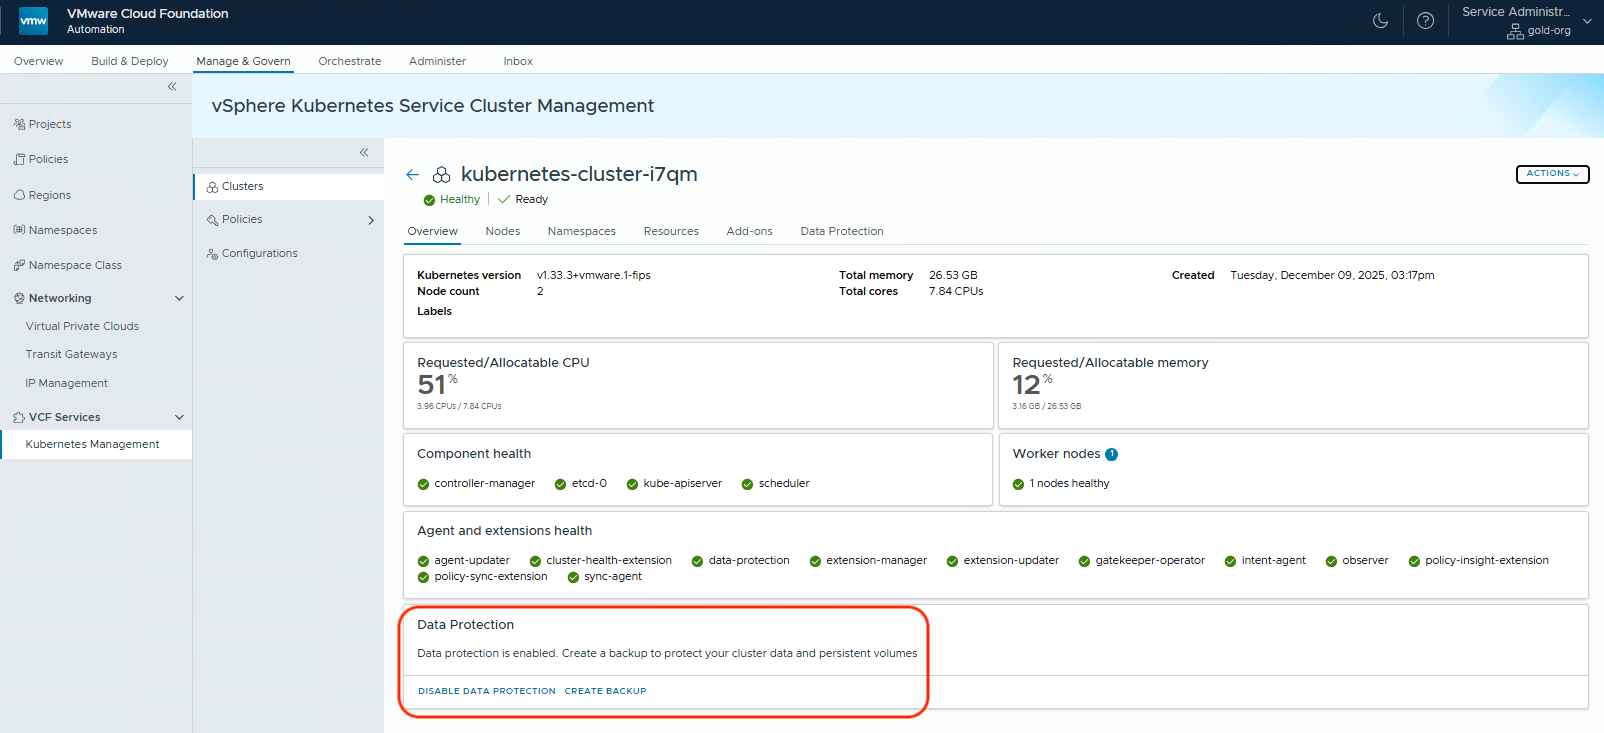
First of all, to get access to the new capabilities, you need to be logged in to the VCF Automation Organization Portal. From there, navigate to the Manage & Govern section. Select Kubernetes Management under VCF Services in the left hand navigation pane, then select clusters and this will reveal which VKS clusters are deployed. In this example, there is only one. The fact that it appears here suggests that VKSM has already discovered this cluster and has added the appropriate add-ons to allow it to be managed from VCF Automation. It is in a Healthy and Ready state, which is obviously good. This view alone, when you have many, many VKS clusters, can really help determine the status of your VKS estate at a glance.

Initial Setup
Initially you will find that Data Protection is not enabled on your VKS cluster. To enable Data Protection, you will need to have access to an S3 compatible object store bucket as this is where Data Protection sends the backup data. To enable Data Protection, click on the link highlighted below.

When you enable data protection, this popup appears. VKSM DP uses Velero to provide backup and restore functionality. Backups can use both File System Backup (FSB) and CSI snapshots. Later, we will see how we can choose between the different backup methods for volumes. Click on Enable to continue.

Once Data Protection has been enabled, you will see a new Data Protection tab for the cluster. You will also see a new data-protection agent/extension in the health view. Lastly, you will notice a warning about a missing backup target. This is the S3 bucket mentioned earlier. We will need to create a set of credentials for this target, as well as configure the target.

A similar, related message about missing credentials is seen if you try to configure the target location without first creating some credentials. Create the credentials by navigating to Configurations page, shown below. There are two configurations here – Credentials and Target Locations. Start with creating a new set of credentials.

The account credentials should contain an access key and secret key to allow Velero to access the S3 bucket. This is so that it can send the file backup data and potentially the CSI snapshot data, if this method is chosen for volume backups. More on this when we take a backup.

With the credential created, we can now begin to create the backup target. First step is to provide the credentials for the backup target which we just created in the previous step.

We then begin providing details about the storage provider and bucket. In this case, I am using a MinIO object store, but any compatible S3 API bucket should suffice. Because I have TLS enabled on MinIO, I am providing a Certificate Authority from the MinIO server to that trust can be established to it by VKSM DP / Velero .

Next, from my list of VKS clusters, I select which ones are allowed to use this backup target. As I only have a single VKS, I only choose one in this example. Note that as you create further VKS clusters, you will also need to navigate to this point to assign your new cluster to the existing backup target location to allow it to use VKSM DP.

After giving the backup target a name, I save it. The backup target is now successfully configured.

Data Protection is now available on my VKS cluster.
This completes the setup. Let’s now try some backup and restore operations.
Create a stateful app on the VKS cluster
To provide something useful for the backup and restore, I made a very simple Pod and PVC using the below manifests, and deployed them into a new namespace in the VKS cluster called cormac-ns. Obviously this is a very simple example, as you can use VKSM DP to backup the whole of the VKS cluster. However, this simple app is just to show the backup and restore functionality in a way that is easy to follow. I won’t delve into describing the contents of each manifest. There is plenty of K8s documentation online that describe this already.
apiVersion: v1
kind: PersistentVolumeClaim
metadata:
name: cormac-block-pvc
namespace: cormac-ns
spec:
accessModes:
– ReadWriteOnce
resources:
requests:
storage: 5Gi
storageClassName: vsan-default-storage-policy
—
apiVersion: v1
kind: Pod
metadata:
name: cormac-pod
namespace: cormac-ns
spec:
securityContext:
runAsUser: 1000
runAsGroup: 3000
fsGroup: 2000
supplementalGroups: [4000]
containers:
– name: busybox
image: “busybox:latest”
command: [ “sleep”, “1000000” ]
securityContext:
allowPrivilegeEscalation: false
capabilities:
drop: [“ALL”]
runAsNonRoot: true
runAsUser: 1000
seccompProfile:
type: “RuntimeDefault”
volumeMounts:
– mountPath: “/demo”
name: demo-vol
volumes:
– name: demo-vol
persistentVolumeClaim:
claimName: cormac-block-pvc
Apply these manifests, and if you wish, use the kubectl exec onto the pod and create some files in the /demo folder which is where the volume has been mounted to.
VKSM DP Backup
Using KSM Data Protection, I can now initiate a backup. The first question that you are prompted with is to select the object or objects that you wish to backup. This could be the whole VKS cluster, a namespace, or a set of objects identified by a selector. In this case, I went with a single namespace backup, cormac-ns.

Now comes the interesting part which is determining “how” to do the backup. There are two options for the File Share Backup (FSB), opt-in and opt-out. If you choose FSB Opt-in, then you have to add some special annotation to the volumes (i.e., Opt-in) if you WANT them to be backed up by FSB. If you choose FSB Opt-out, again, you have add special annotations (i.e., Opt-out) if you DO NOT WANT the volumes to be backed up by FSB. Thus, if you want all volumes to be backed up using the CSI snapshot method, select both “Use FSB Opt-in approach” and “Use CSI Snapshot backup” as shown below. If no FSB annotations are added to any volumes, then CSI will be used for all volumes. See https://velero.io/docs/v1.10/file-system-backup/#using-the-opt-out-approach for more information on annotations. Note that you are annotating with the name of the volume as seen by the Pod, not the actual PVC name. The “do not meet prerequisites for CSI snapshot” is a warning and can be ignored in as VKS Clusters deployed via VCF Automation should automatically have all of the necessary components in place. However, there is a link provided to the documentation where you can verify that the pre-requisites are indeed being met.

Once you have decided on the volume backup method, click next. Now select the backup location that we created previously.

Set the backup schedule. You can create a schedule to meet your requirements, and take backup son a regular basic. Or, do what I am doing here and take a one-off backup right now.

Select a retention policy for the backup (how long to keep it). By default the retention is set to 30 days.

Give the backup a name, and hit the create button.

Backup will enter in progress state, and all going well, should soon report completion.

After completion, click on the backup to see the backup details. It should report that the backup method was CSI snapshot and not FSB in the Persistent Volumes section. If it reports FSB, check that you made the correct backup selection, and that the Pod does not have any FSB annotations if FSB Opt-in was chosen.

VKSM DP Restore
Let’s start a restore by first deleting the cormac-ns namespace. This will also delete the pod and pvc in the namespace.
$ kubectl delete ns cormac-ns
Now let’s use VKMS DP to restore the namespace and its contents from our previous backup. There is a restore backup button in the top right hand corner of the backup details screen which we click to begin the operation.

You are now prompted to select the scope of the restore. Is it the full backup you wish to restore, or perhaps just a single namespace or a set of objects identified by a label. I’ve selected a single namespace just to show you an example, but of course, we only backed up a single namespace anyway so we could have chosen to restore the entire backup. But hopefully you can see the flexibility available.

Next, select the volumes to restore (optional). As we have only backed up a single volume using CSI snapshots, then this is the only volume available to restore as well. However, if you did not want to restore the volume, then you could un-click this option and just restore the pod.

Finally, give the restore job a name, and click on the restore button.

Once the restore successfully completes, you should observe the namespace and its contents restored.
$ kubectl get pod,pvc -n cormac-ns
NAME            READY  STATUS   RESTARTS  AGE
pod/cormac-pod  1/1    Running  0         5m23s

NAME                                     STATUS  VOLUME                                    CAPACITY  ACCESS MODES  STORAGECLASS                 VOLUMEATTRIBUTESCLASS  AGE
persistentvolumeclaim/cormac-block-pvc   Bound   pvc-0f8fd0bc-c2c2-4a9e-89b9-b9e6f2b9d1f3  5Gi       RWO           vsan-default-storage-policy  <unset>                5m24s
Success. We have used VKSM Data Protection to backup and restore a namespace. That completes the post. I think this is a really nice feature which is now available as part of VKSM in VCFA 9.0.1 and later.
One Reply to “A first look at VKSM Data Protection (VKSM DP)”