

The first step is to make sure that you have a VM with photon controller command line interface (cli) installed. I used a Photon OS VM once more, and did a git clone of the photon controller cli, as shown in this previous post here. Afterwards, I verified the version of photon controller cli as follows:
# photon -v
photon version Git commit hash: 41ea26b
While you can do all of the following steps manually, here is a script that I used to set up networks, tenants, images, flavors and so in photon controller, before eventually deploying Kubernetes. You will notice that there is a reference to an image called “kubernetes-1.4.3-pc-1.1.0-5de1cb7.ova“. This can be found on the photon controller 1.1. release page on github here but be aware that the number may change. You will need to download the OVA locally, and modify the script to point to the correct location (if not /root) and the correctly named OVA. You will also need two static IP addresses for the master VM and the etcd VM in the cluster create line near the bottom. You will need to modify the ip addresses that I used, as well as gateway, DNS and netmask info that is correct for your environment. I have also chosen to deploy 10 worker VMs, and these will pick up IP addresses via DHCP. You can change this number as needed. Then it is simply a matter of selecting the correct target by running “photon target set http://ip-address-of-photon-controller” and then running the script. Just to be clear, this is provided as is, with no support whatsoever. But I have used it a few times myself and it seems to work fine.
#!/bin/bash

echo "... create network ..."
photon -n network create --name dev-network --portgroups "VM Network" \
--description "Dev Network for VMs"
NETWORK_ID=`photon network list | grep "dev-network" | cut -d\ -f1`
photon -n network set-default $NETWORK_ID

echo "... load image ..."
K8S_IMAGE_FILE="/root/kubernetes-1.4.3-pc-1.1.0-5de1cb7.ova"
photon -n image create $K8S_IMAGE_FILE -n photon-kubernetes-vm-disk1 -i EAGER
IMAGE_ID=`photon image list | grep photon-kubernetes-vm | cut -d\ -f1`

echo "... enable k8s on deployment ..."
# get the deployment id
DEPLOY_ID=`photon deployment show | grep 'Deployment ID' | cut -d\ -f3`
photon -n deployment enable-cluster-type $DEPLOY_ID --type=KUBERNETES \
--image-id=$IMAGE_ID

echo "... create disk flavor ..."
# create disk flavour
photon -n flavor create --name "vsan-disk" --kind "ephemeral-disk" \
--cost "storage.VSAN 1.0 COUNT"

echo "... create vm flavor ..."
# create vm flavor
photon -n flavor create --name cluster-tiny-vm --kind "vm" --cost "vm 1 COUNT,\
vm.flavor.cluster-other-vm 1 COUNT,vm.cpu 1 COUNT,vm.memory 1 GB,vm.cost 1 COUNT"

echo "... create tenant ..."
photon -n tenant create k8sEng
photon -n tenant set k8sEng

echo "... create ticket ..."
photon -n resource-ticket create --name k8s-gold-ticket \
--limits "vm.memory 64 GB, vm 200 COUNT"

echo "... create project ..."
photon -n project create --resource-ticket k8s-gold-ticket \
--name k8s-project --limits "vm.memory 64 GB, vm 200 COUNT"
photon project set k8s-project

echo "... create cluster ..."
photon -n cluster create -n k8s-cluster -k KUBERNETES \
 --dns 10.27.51.252 --gateway 10.27.51.254 --netmask 255.255.255.0 \
 --master-ip 10.27.51.118 --container-network 10.2.0.0/16 \
 --etcd1 10.27.51.119 --worker_count 10 -v cluster-tiny-vm -d vsan-disk
The way in which we are consuming vSAN storage for these VMs is the inclusion of a disk flavor called “vsan-disk”. When we create the cluster at the end of the script, we are specifying this as a disk flavor using the “-d” option. If you have problems, add a -x to the #!/bin/bash in the first line of the script to get debug output. Here is a sample run of the script.
root@photon-full-GA-1 [ ~ ]# ./deploy_k8s.sh
./deploy_k8s.sh
... create network ...
85647972541f6d14d0be9
85647972541f6d14d0be9
... load image ...
3fca0ff2-de1b-4b8d-bf47-389258391af6
... enable k8s on deployment ...

... create disk flavor ...
85647972541f6d3463824
... create vm flavor ...
85647972541f6d347f959
... create tenant ...
85647972541f6d3483fa9
... create ticket ...
85647972541f6d34bbe31
... create project ...
85647972541f6d34d96ec
Using target 'http://10.27.51.117:28080'
Project set to 'k8s-project'
... create cluster ...
2016/11/23 12:41:21 photon: Timed out waiting for task \
'85647972541f6d34f86f1'. Task may not be in error state, \
examine task for full details.
One caveat, as highlighted in the last line of the output above, is that it may take some time for the K8S OVA image to upload to your image datastore. If it does, then the cluster creation may timeout from a user perspective as it will need these images uploaded to create the VMs running K8S. Even if it does timeout, it should still continue to run in the background. One option is to pause or sleep the script, and monitor the upload progress task via the host client of the ESXi. Once the image has been uploaded, you can then resume the script/cluster creation. You can examine the state of the cluster with the following command – note that in this case, it is still “creating”:
root@photon-full-GA-1 [ ~ ]# photon cluster list
Using target 'http://10.27.51.117:28080'
ID                                    Name         Type        State     Worker Count
402ae2c7-36f1-45ba-bd44-514af1d10008  k8s-cluster  KUBERNETES  CREATING  10

Total: 1
CREATING: 1
Eventually, everything should deploy. A successful run, where the image has been pre-loaded, should look something like this:
root@photon-full-GA-1 [ ~ ]# ./deploy_k8s.sh
... create network ...
85647972541f881fce638
85647972541f881fce638
... enable k8s on deployment ...

... create disk flavor ...
... create vm flavor ...
... create tenant ...
85647972541f882157749
... create ticket ...
85647972541f88218f5d0
... create project ...
85647972541f8821ad659
Using target 'http://10.27.51.117:28080'
Project set to 'k8s-project'
... create cluster ...
fab086ac-35cf-4972-9478-447c4bf847e6
Note: the cluster has been created with minimal resources. You can use the cluster now.
A background task is running to gradually expand the cluster to its target capacity.
You can run 'cluster show ' to see the state of the cluster.
root@photon-full-GA-1 [ ~ ]#
And when it deploys completely, you should see something like this:
root@photon-full-GA-1 [ ~ ]# photon cluster list
Using target 'http://10.27.51.117:28080'
ID                                    Name         Type        State  Worker Count
1a6abca3-406c-4b30-85c7-0a23a28b024d  k8s-cluster  KUBERNETES  READY  10

Total: 1
READY: 1
root@photon-full-GA-1 [ ~ ]#
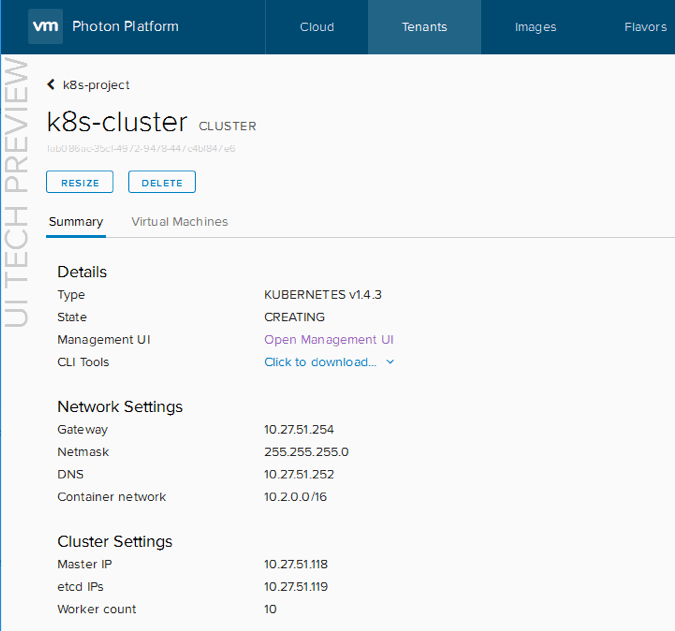
Either way, once the master and etcd VMs are deployed, you should be able to navigate to the tenants, images and flavors section of the Photon Controller UI, and examine the cluster. Under Tenants, click on the k8sEng tenant (or whatever you called your tenant). Then under projects, click on the name of the k8s-project (or whatever you called your project). This should show you the master, etcd, and worker VMs as they are deployed. 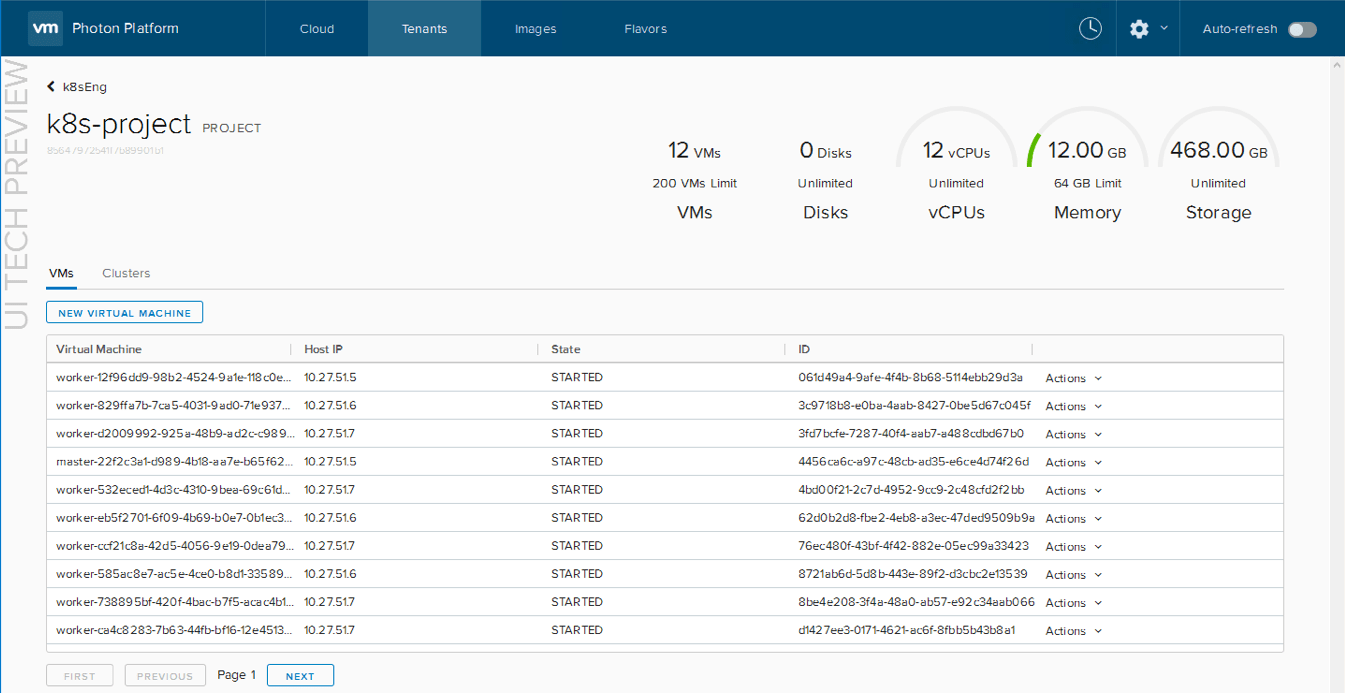
The last part of this is to just make sure that vSAN is being utilized, i.e. that the VMs are actually consuming vSAN storage. Yes, you could log onto the ESXi hosts, and check the storage of the VMs. But since we also have RVC available, let’s run a few commands to see whats happening there. For example, the object status report shows us the following:
/vsan-mgmt-srvr.rainpole.com/Global/computers> vsan.obj_status_report 0
2016-11-23 14:32:38 +0000: Querying all VMs on VSAN ...
2016-11-23 14:32:38 +0000: Querying all objects in the system from esxi-hp-05.rainpole.com ...
2016-11-23 14:32:39 +0000: Querying all disks in the system from esxi-hp-05.rainpole.com ...
2016-11-23 14:32:39 +0000: Querying all components in the system from esxi-hp-05.rainpole.com ...
2016-11-23 14:32:39 +0000: Querying all object versions in the system ...
2016-11-23 14:32:41 +0000: Got all the info, computing table ...

Histogram of component health for non-orphaned objects

+-------------------------------------+------------------------------+
| Num Healthy Comps / Total Num Comps | Num objects with such status |
+-------------------------------------+------------------------------+
| 3/3 (OK)                            |  42                          |
+-------------------------------------+------------------------------+
Total non-orphans: 42


Histogram of component health for possibly orphaned objects

+-------------------------------------+------------------------------+
| Num Healthy Comps / Total Num Comps | Num objects with such status |
+-------------------------------------+------------------------------+
+-------------------------------------+------------------------------+
Total orphans: 0

Total v1 objects: 0
Total v2 objects: 0
Total v2.5 objects: 0
Total v3 objects: 42
Total v5 objects: 0
/vsan-mgmt-srvr.rainpole.com/Global/computers>
42 objects would account for the master, etcd and 10 worker VMs , when you add in boot disks, swap files and home namespaces. And of course, you have many other RVC commands to use, such as vsan.cluster_info and of course the health of vSAN using vsan.health.
PS – I also created an “undeploy” script to run through the process of tearing down this Kubernetes cluster afterwards. This uses the same names for tenants, project, clusters, etc, as the “deploy” script, so if you change them, you will need to edit the “undeploy” script accordingly.
#!/bin/bash

# cluster show
echo "... cluster show ..."
K8S_CLUSTER_ID=`photon cluster list | grep 'k8s-cluster' | cut -d\ -f1`
photon cluster show $K8S_CLUSTER_ID

echo "... cluster remove.."
# remove cluster
photon -n cluster delete $K8S_CLUSTER_ID

# get the deployment id
DEPLOY_ID=`photon deployment show | grep 'Deployment ID' | cut -d\ -f3`

echo "... disable k8s in deployment ..."
# disable K8s from deployment
photon -n deployment disable-cluster-type $DEPLOY_ID --type=KUBERNETES

echo "... project remove.."
# get the project id
PROJECT_ID=`photon -n project list | grep k8s-project | cut -f1`
echo $PROJECT_ID

# remove project
photon -n project delete $PROJECT_ID

echo "... ticket remove.."
# get the resource ticket id
TICKET_ID=`photon resource-ticket list | grep k8s-gold-ticket | cut -d' ' -f1`
echo $TICKET_ID

#remove the resource ticket
photon -n resource-ticket delete $TICKET_ID
echo "... tenant remove.."

# get the tenant id
TENANT_ID=`photon -n tenant list | grep k8sEng | cut -f1`
echo $TENANT_ID

# remove the tenant
photon -n tenant delete $TENANT_ID

echo "... network remove.."
# remove the network
NETWORK_ID=`photon network list | grep "dev-network" | cut -d\ -f1`
photon -n network delete $NETWORK_ID

echo "... image remove.."
# remove the image
IMAGE_ID=`photon image list | grep photon-kubernetes-vm | cut -d\ -f1`
echo $IMAGE_ID
photon -n image delete $IMAGE_ID

echo "... flavor remove.."
# delete disk flavour
DISK_FLAVOR=`photon flavor list | grep "vsan-disk" | cut -d\ -f1`
echo $DISK_FLAVOR
photon -n flavor delete $DISK_FLAVOR

# delete vm flavor
VM_FLAVOR=`photon flavor list | grep "cluster-tiny-vm" | cut -d\ -f1`
echo $VM_FLAVOR
photon -n flavor delete $VM_FLAVOR

echo "cleanup done"
Once again, you can run through all of these steps manually if you wish, but the script approach may save you some time.